
(Page last updated: Feb 06, 2026)
Here is a solution to open any garage door, gate, barrier or car, using any frequency from 0 to 1500 MHz, and using the modulation types AM and FM.
An Android App is making it possible to control a Raspberry Pi via Bluetooth, and handling all keyless remote entry systems on the market.
New 10-Jul-2025: Flipper zero custom firmware with Car-Support
Quick Jump:
In cooperation with PandwaRF:
![]()
In cooperation with Flipper
zero:

This is useful if you have lost all of your remotes to your garage. (Which
happens quite a lot ![]() )
)
Brute Force attack is possible for all fixed code remotes which are using up to 20 bits for the code, which are:
Came, Tedsen, Kaeuferle, Nice, Ruku / Ansonic, Tormatic, Cardin, Dickert, Endress, Marantec, Hoermann, Einhell, Berner, Chamberlain, Rademacher, CDS, Bosch 12 DIP, Bosch 20 DIP.
Supported Fixed-Code Remote details can be seen here: Remote Cloner Compatibility List.
Below list is only a part of
known/supported Brands/Vendors.
Much more Brands/Vendors are using same transmissions and are supported too.
|
Fixed Code Remotes |
||||
| Brand/Vendor | Models | Freqs | DIP switch |
Brutable |
| Hormann | DH01 / HSM4 | 26.975 AM | 10 |
|
| Bosch | 26.975 AM / 26.995 AM / 40.685 AM | 12 / 20 + 2 |
|
|
| Berner / Tedsen | SM | 26.985 AM | 9 tri-DIP |
|
| Endress | BW27 | 26.985 AM | 10 |
|
| Einhell | 26.995 AM | 10 tri-DIP |
|
|
| Kauferle/Dickert | TX27 / MAHS27 / AHS27 / DX27 | 27.015 AM | 10 |
|
| Marantec | 27.045 AM | 10 |
|
|
| Nice | K1/K4 | 27.120 AM | 10 |
|
| Chamberlain/Liftmaster | 750E | 27.145 FM | ||
| Chamberlain/Liftmaster | 751E | 27.145 FM | 9 |
|
| Cardin | S466 | 27.195 AM | 9 tri-DIP + 2 |
|
| Ruku/Ansonic | SA40 | 40.685 AM | 10 |
|
| Ruku/Ansonic | SF40 | 40.662 FM | 10 |
|
| Dickert | MAHS40 / AHS40 / DX40 | 40.685 AM | 10 |
|
| Dickert | FHS10 / FHS20 | 40.685 FM | 0 | |
| Wecla | 806011 | 40.685 AM | 12 |
|
| Rademacher | Rator 40 | 40.685 AM | 10 |
|
| SMD | LW40HS98 | 40.685 AM | 10 |
|
| Sommer | 4050 | 40.685 AM | ||
| Dorma/Tormatic | 40.685 FM | 10 |
|
|
| Toko | TO40TX same as Dorma/Tormatic | 40.685 FM | 10 |
|
| Linear | 310.00 AM | 8 |
|
|
| Multicode | 310.00 AM | 12 |
|
|
| Stanley | 310.00 AM | 12 |
|
|
| Fadini | Astro | 314.35 AM | 10 |
|
| Pulsar | 318.00 AM | 9 |
|
|
| Liftmaster | 1 DIP / 4 DIP | 389.9 AM | 9 tri-DIP |
|
| Overhead | 390 AM | 9 tri-DIP |
|
|
| Liftmaster | 60K | 433.92 AM | ||
| Dickert | MAHS433 | 433.92 AM | 10 tri-DIP |
|
| Dickert | S10 | 433.92 AM | 0 | |
| Ruku/Ansonic | SA434 | 433.92 AM | 10 |
|
| Ruku/Ansonic | SF433 | 433.92 FM | 10 |
|
| Ruku/Ansonic | SA868 | 433.92 AM | 10 |
|
| Hormann | HSM4 / BiSecur in HSM4 mode | 40.685 / 433.92 / 868.3 AM | ||
| Marantec/Alulux | 433.92 AM | |||
| Came | Top models | 433.92 AM | 10 |
|
| Tedsen/Berner/Elka | SKX | 433.92 AM | 9 tri-DIP |
|
| Nice | Flo | 433.92 AM | 10 |
|
| Kauferle/Dickert | TX433 / MAHS433 | 433.92 AM | 10 |
|
| Chamberlain/Liftmaster | 433.92 AM | |||
| Ducati | 433.92 AM | 10 |
|
|
| Doepke | 433.92 AM | 10 |
|
|
| Dorma/Tormatic | HD43 | 433.92 AM | 10 |
|
| Cardin | S476-TX2 | 433.92 AM | 9 tri-DIP + 2 |
|
| FAAC | TM433 | 433.92 AM | 12 |
|
| Intertechno | ITS150 | 433.92 AM | 16 |
|
| Brennenstuhl | RCS 1000SN | 433.92 AM | 5 |
|
| SMC | 5326 | 433.92 AM | 8 |
|
| Unitec | EIM-821 | 433.92 AM | 5 |
|
| Intertec | 50074 | 433.92 AM | ||
| Voltomat | 24687005 | 433.92 AM | ||
| Princeton | 25 bit | 433.92 AM | ||
| Berner | BHS140 | 868.3 AM | ||
| Dickert | S10 | 868.3 AM | 10 |
|
|
Keeloq Remotes |
||||
| Brand/Vendor | Models | Encryption/Decryption | remote learning | Flipper support |
| ACM | TX2 / TX4 | simple custom bit | ||
| ADYX | 433-HG Bravo | |||
| AERF | Compact / Hy-dom / Sabuton / Saturn / ST /Terra / Tmp / Unitech | custom 10 bit | ||
| Allmatic | Bro.Over / Brown / Brown Mini / Pass / Tech | simple 10 bit |
|
|
| Alutech | custom | |||
| Ansonic | SA 868 R | simple 10 bit | ||
| Aperto | TX4020 / TX03 | normal 10 bit |
|
|
| Aprimatic | TR / TM 4 / TX-E / TX2P / TX4S / TXM | simple 10 bit |
|
|
| ATA | PTX4 | normal 12 bit |
|
|
| Balan | 4013 / BFM 404 / FM404 / S435 / S449 | |||
| Beninca | Apple / Cupido / Azul / IO / LOT WCV / Rollkey / T4WK / T4WV / Togo WK/WV | simple XOR |
|
|
| Bernal | TX Pico B 440.504-S1 868.5 MHz (not fully supported yet) | normal custom bit | ||
| Beta | 2011 | normal 10 bit | ||
| BFT | B-RCA / BRC-B / Mitto / TRC / Kleio / RB | secure 32 bit Seed 10 bit |
|
|
| Breda | 4013 | |||
| Casali | JA33 Amigo | |||
| Casit | Be Happy RS / MTE / VTM | |||
| Came | Space | simple 10 bit | ||
| Came | Space 2 | simple 10 bit custom CRC | ||
| Cardin | S449 / S486 | normal (10 bit receiver/12bit remote) |
|
|
| Celinsa | Movecode / X-2 / Z-2 | simple 12 bit |
|
|
| Centurion | NOVA-TX | normal 10 bit |
|
|
| Clemsa | Mutancode / Mutancode Mini | normal 12 bit |
|
|
| Comunello | Keep 2/4 / Victor 2/4 | normal 10 bit |
|
|
| Crawford | EA433K/KM / T-433 | simple 10 bit | ||
| Cyacsa | Neo / Twin | |||
| Dea | GT2 / Genie R 273 / GOLDR / MIO TR / Punto | simple 10 bit |
|
|
| Detumando | DTM Roll | normal (10?) bit |
|
|
| Dickert | S10 A4K00 | simple 8 bit | ||
| Dickert | S8Q 868 Mhz | simple 8 bit | ||
| Dmil | Neo / Twin | |||
| Doorhan | TX | simple 10 bit |
|
|
| Doorking | MicroPLUS 318 MHz (not fully supported yet) | normal | ||
| Doormatic | Mileny | normal 10 bit |
|
|
| DTM | Neo / Tip / Victory | simple 12 bit |
|
|
| Ecostar | RSC2 / RSE2 / RSZ | normal 10 bit | ||
| Eikia | custom | |||
| Elmes | DWB100HT / UMB100HT | |||
| Elemat | Hibrid Plus / Twin | |||
| Elvox | ERT / ETR | normal 10 bit |
|
|
| Emetteur | TX 43-2 02035231332 (French unknown Brand) | simple 10/12 bit | ||
| EMFA | MAP / Neo / Twin | |||
| Erreka | IRIS / LIRA / Roller / SOL / Vega | secure 32 bit Seed 8 bit |
|
|
| ET System | Blue / Mix | normal 10 bit |
|
|
| ETDOOR | Maguisa / Mimosa | custom | ||
| Extel | ATEM800021 | |||
| FAAC | RC | normal 12 bit |
|
|
| FAAC | SLH /
XT2 (greetings to
Silvia |
secure 32 bit Seed 12 bit |
|
|
| FAAC | FIX2 | |||
| Fadini | Birio / Jubi / SITI | simple 12 bit | ||
| Forsa | Neo / Twin | |||
| Genie | custom | |||
| Genius | Bravo | normal 10 bit |
|
|
| Genius | Echo / Kilo | normal 12 bit |
|
|
| Genius | Amigo | secure 32 bit Seed 12 bit |
|
|
| Gibidi | AU1600 / AU1680 / Domino | simple 10 bit |
|
|
| GSN | TR 300 / TR 500 / TX | normal 10 bit |
|
|
| Hato | T3498 | normal 12 bit |
|
|
| HCS FAAC | same as FAAC-RC | secure 32 bit Seed 12 bit | ||
| HCS101 | same as Pax | custom | ||
| IL-100 | same as Sea | simple 10 bit | ||
| IronLogic | simple 10 bit | |||
| Jarolift | normal 10 bit | |||
| JCM | Neo RC / Go Pro / Twin / Cubells / Forsa / DMIL / HYDOM / Hybrid | simple 8 bit |
|
|
| Jolly Motor | Tx Mini | simple 10 bit | ||
| Key | SUB-44R / PLAY4R / TXG-44R / TXB-44R | simple / custom bit | ||
| Kinggates | Stylo 4 K | simple 8 bit | ||
| Ligur | same as Schellenberg | normal 12 bit |
|
|
| Linear | HCT / MCT / ACT | simple 10 bit | ||
| Mc Garcia | simple 10 bit | |||
| Merlin | normal custom bit |
|
||
| MHouse | GTX / GTXC / Moovo / RT3 / TX4 | simple 8 bit |
|
|
| MHZ1100N | same as Doorhan | simple 10 bit |
|
|
| Monarch | normal custom bit | |||
| Motorlift | 9433xE/EML | |||
| Motorline | MX4SP | normal 10 bit |
|
|
| Neotech | same as Space | simple 10 bit | ||
| Nice | Smilo | simple 8 bit |
|
|
| No-Name | Emetteur TX 43-2 02035231332 (French unknown Brand) | simple 10/12 bit | ||
| No-Name | HS-2 (Aldi/Lidl Remote) | simple 8/10 bit | ||
| Normstahl | RA3433 / RCU 2K / 4K / Entrematic / T433 | normal 10 bit / simple 8 bit |
|
|
| Norton | Neo / NOR 20 / TXCD |
|
||
| Nova | same as Centurion | normal 10 bit |
|
|
| Novoferm | MHS43-02 / MxHS / Novotron 502 / 302 | simple 10 bit | ||
| O&O | TX-RC | simple 8 bit | ||
| Open Out | AU1600 / AU1680 / Domino | |||
| Pax-II / Pax-2E | 600N / 800N / 1000N / 1200N | custom | ||
| Pecinin | 3C | simple 12 bit | ||
| Proem | ERC4/ACS | |||
| Profelm | same as ETDoor | custom | ||
| Proxima | similiar to Key | simple custom | ||
| Puertas | Norton / Cubells / Roper / JCM 2nd | custom 12 bit | ||
| Pujol | Neo / Twin / Universal / Vario | simple 8 bit / custom |
|
|
| Rademacher | Rator 4385 (not fully supported yet) | normal | ||
| RCG12C | same as ATA PTX but 10 bit | normal 10 bit | ||
| Rolltore | MPSTP2E | |||
| Roper | Neo | simple 8 bit |
|
|
| Rosh | simple 12 bit | |||
| Rossi | CT | simple 12 bit | ||
| Ruku | SA 868 R | simple 10 bit | ||
| Sanford | normal 10 bit |
|
||
| Sabutom | Bro / Broover / Brostar / Novo / Present / Compat / TT | |||
| Sea | Head / Coccinella | simple 10 bit | ||
| Seav | Be Good / Be Smart / Be Happy RH/RS | normal 12 bit |
|
|
| Schellenberg | 60853 | normal 12 bit |
|
|
| Schellenberg | 60851 (not fully supported yet) | normal | ||
| Silvelox | ECO TSM2/4 | simple 10 bit | ||
| Siminor | CVXNL / Mitto / SIM433 | |||
| Skymaster | MHZ / TX4 | simple 10 bit | ||
| Sommer | 4020 TX03 / 4025 / 4026 / 4031 | normal 10 bit |
|
|
| Space | SP | simple 10 bit | ||
| Stanley | normal 12 bit / simple | |||
| Stagnoli | Venus | simple XOR | ||
| Starline | A2-A4 / A6-A9 / B6-B9 | custom bit | ||
| Steelmate | normal 12 bit |
|
||
| Subaru | custom 10 bit | |||
| Teko | ||||
| Telcoma | FM402 | custom | ||
| Tormatic | MCHS / MNHS / Novotron | |||
| Tormatic | Black design 433 MHz (same Key as Novoferm) | simple 10 or 12 bit | ||
| Tousek | RS 433-TXR4 | simple 10 bit | ||
| Toyota | Rush | simple 10 bit | ||
| VDS | ECO-R / TX 02 | |||
| Verex | ||||
| Wayne Dalton | TX02433 / Star 302/304 / E2F | normal 12 bit / simple | ||
| Wisniowski | Lunar / 4GO / Pulsar RTS | normal 12 bit |
|
|
![]() - Remote
learning is automated in the Android App and can learn remotes to receivers with
1 click!
- Remote
learning is automated in the Android App and can learn remotes to receivers with
1 click!
|
Keeloq Go Models |
||
| Brand/Vendor | Models | remote learning |
| Baleato | Go |
|
| Caren | Go |
|
| Collbaix | Go |
|
| Cubells | Go |
|
| CYACSA | Go / Mini Go |
|
| Diasan | Go |
|
| DMIL | Go 2 / Go 4 / Mini Go |
|
| Elemat | Go 2 / Go 4 / Mini Go |
|
| EMFA | Go / Mini Go |
|
| Forsa | Go 2 / Go 4 / Mini Go |
|
| Gibidi | Go |
|
| Gycsa | Go |
|
| Hibrid | Go |
|
| Hydom | Go |
|
| Imeba | Go |
|
| JCM | Go 2 / Go 4 / Mini Go |
|
| Noratek | Go |
|
| Norton | Go / Mini Go |
|
| Nueva Castilla | Go |
|
| Portis | Go |
|
| Roper | Go 2 / Go 4 / Mini Go |
|
| Zibor | Go |
|
|
AES 128 bit Remotes |
|||
| Brand/Vendor | Models | encoding | |
| Beninca | TO.GO 2/4 VA models AES 128 433.92 MHz | ECB | |
| Cardin | S508 C2/C4 / TXQ508 C2/C4 128 bit custom encryption 868.35 MHz | custom | |
| Fadini | vix 53 AES 128 868.19 MHz GFSK | ECB | |
| Fadini | Red vix 53 AES 128 868.19 MHz GFSK | ECB | |
| Horman | BiSecur 868.3 MHz AES 128 11 rounds | custom | |
| Hyundai | different models AES128 433.92 MHz | ECB | |
| Kia | different models AES128 433.92 MHz | ECB | |
| Normstahl | Entrematic ZENP2MT/ZENP4MT AES128 868.35 MHz | ECB | |
| Prastel | Slim+ AES 128 433.92 MHz | ECB | |
| Sommer | Pearl Somloq2 AES 128 868.95 MHz | ECB | |
| Somfy | IO Homecontrol AES 128 | ECB | |
|
Other Rolling Code Remotes |
|||
| Brand/Vendor | Models | remote learning
|
|
| Aprimatic | TXM | ||
| Avidsen | 104250 / 104257 / 104350 / 10470x / 654xxx / RMC | ||
| Came | Atomo | ||
| Came | Twin (10 Dip) | ||
| Cardin | S435 / S437 TX / S438 TX | ||
| Cardin | S508 C2/C4 / TXQ508 C2/C4 128 bit 868.35 MHz | ||
| Chamberlain 1 | 5433 / 75EML / 8433 / 9433 | ||
| Chamberlain 2.0 | 89xLM / 89xMAX / 95xEV / TX4RUNI | ||
| Ditec | BIX / GOL4 |
|
|
| Horman | BiSecur | ||
| Kinggates | Stylo 4 |
|
|
| Kinggates | Stylo 4 K (Stylo 4 K is using Keeloq) | ||
| Liftmaster | 8433 / 9433 / TX4RUNI | ||
| Nice | Era-Flor / Ergo / FloR-S / INTI / On xE / Very |
|
|
| Normstahl | Entrematic ZENP2MT/ZENP4MT AES128 encryption | ||
| Prastel | BFOR / MPSTLE / MTE / TC4E |
|
|
| Ryobi | GDA100 / GDA200 (not fully supported yet) | ||
| Sminn | Balea / Duo / Duplo / Quatro |
|
|
| Somfy | Keasy / Keytis / Telis | ||
| Tau | 250 T4 / 250-K-SLIM-RP | ||
| V2 | Handy / Match / Phoenix / Phox / TRC / TSC / TXC |
|
|
|
Car Rolling Code Remotes Non-Keeloq |
||
| Brand/Vendor | Models | Protection |
| Kia | K3 11-19 / K3S 14-19 / K5/Sportage R 15 / K4 13-16 | crc8 |
| Kia | Sorento 2010 - 2017 | none |
| Kia | many models | AES128 |
| Hyundai | many models | AES128 |
| Hyundai | OKA-870T | crc8 |
| Citroen | many models till 2018 | PSA523 |
| Citroen | many models till 2018 | PSA536 |
| Peugeot | many models till 2016 | PSA523 |
| Peugeot | many models till 2016 | PSA536 |
| Subaru | 2000 - 2006 Baja / Impreza / Legacy / Outback | crc4 |
| VW | Golf (signal reception-decoding only!) | unknown |
| Audi | (signal reception-decoding only!) | unknown |
| Mercedes | SL 500 (signal reception-decoding only!) | unknown |
|
Weather / Temperature - Devices |
|||
| Brand/Vendor | Models |
|
|
| Auriol | AFT77B2 | ||
| Infactory | TH | ||
| Acurite | |||
| Hideki | TS04 | ||
| Solight | TE44 | ||
| Conrad | S3318P | ||
| Digitech | XC0324 | ||
| Oregon | THN132N | ||
| Nexus | TH | ||
| Thermopro | |||
| La Crosse | TX141THBv2 | ||
| GT WT 02 | WT02 | ||
| Fineoffset | WH2 | ||
| Alecto | V1 | ||
| Ambientweather | F007TH | ||
|
Car TPMS Tire-Pressure Sensors |
||
| Brand/Vendor | Models |
|
| Ford | ||
| Toyota | ||
|
Restaurant Food Pagers |
||
| Brand/Vendor | Models |
|
| LRS | Coaster Call RX-CS6 / CS7 / US 467.75 MHz | |
| LRS | Coaster Call RX-CS6 / CS7 / DE 446.15625 MHz | |
| LRS | Coaster Call RX-CS6 / CS7 / UK 459.1 MHz | |
|
Gas Station Price Sign |
||
| Brand/Vendor | Models |
|
| Olympian USA | GL-OIL-RF (PT22xx operated 120 360 pulse
lengths) https://github.com/UberGuidoZ/Flipper/tree/main/Sub-GHz/Gas_Sign |
|
Also Check out the Remote Cloner Compatibility List.
Seed Code brute force is also possible for all Rolling Code Remotes using the Android App for these Seed Remotes:
To avoid simple signal capturing and replaying of the same signal to enter your
garage,
Rolling-code remotes are using a counter which is increasing by 1 with each
button-press,
and are encrypting this new counter value before sending the signal over the air to the
receiver.
The receiver is decrypting the current counter value, and prohibiting all
recently used counter values before.
This means, if you create an exact copy of your remote, you won't be able to use
both remotes properly.
If you use one remote for example for 10 times, the counter in the receiver will
have increased by 10,
so your other remote won't work until you have pressed it 10 times to get it in
sync.
That's why most regular Cloners don't make exact copies of
Rolling-Code remotes, and use a different serial code for the copy,
which needs to be registered to the receiver first, to get it to work.
With this solution you will be able to create 100%
copies of rolling code remotes,
but remember that the original remote will get
out of sync!!!
(BTW: Same might apply, why your remote doesn't
work anymore!
Somebody probably captured the signal of your remote with this solution, and increased the counter
by about a 100 times ore more,
which makes your original remote useless!)
This is the scheme most rolling code vendors follow:
A remote signal consists basically of two values.
1 - serial number of this remote
2 - current sync value of this remote
3 - some vendors are creating kind of a CRC value in
addition
Many remote vendors are sending the serial part in "clear" and
the sync value part "encrypted".
But some vendors are scrambling the serial and sync part, which makes it hard to
identify.
Anyhow, because of that scrambling and/or the encryption, there is no way to figure out how the next signal should look like, unless you know the algorithm to it.
With that information you might guess how receivers are handling
multiple remotes.
Multiple remotes can be identified by their serial number.
At first the signal gets decrypted so the serial and sync values are in "clear".
If the serial number of the transmitted signal matches a serial number in the
database of the receiver, then the sync value will be checked.
If the sync value is in a given range, the entry will be granted, and the sync
value in the database will be updated to the new value.
Now you might understand why it's hard to use 2
identical remotes at the same time.
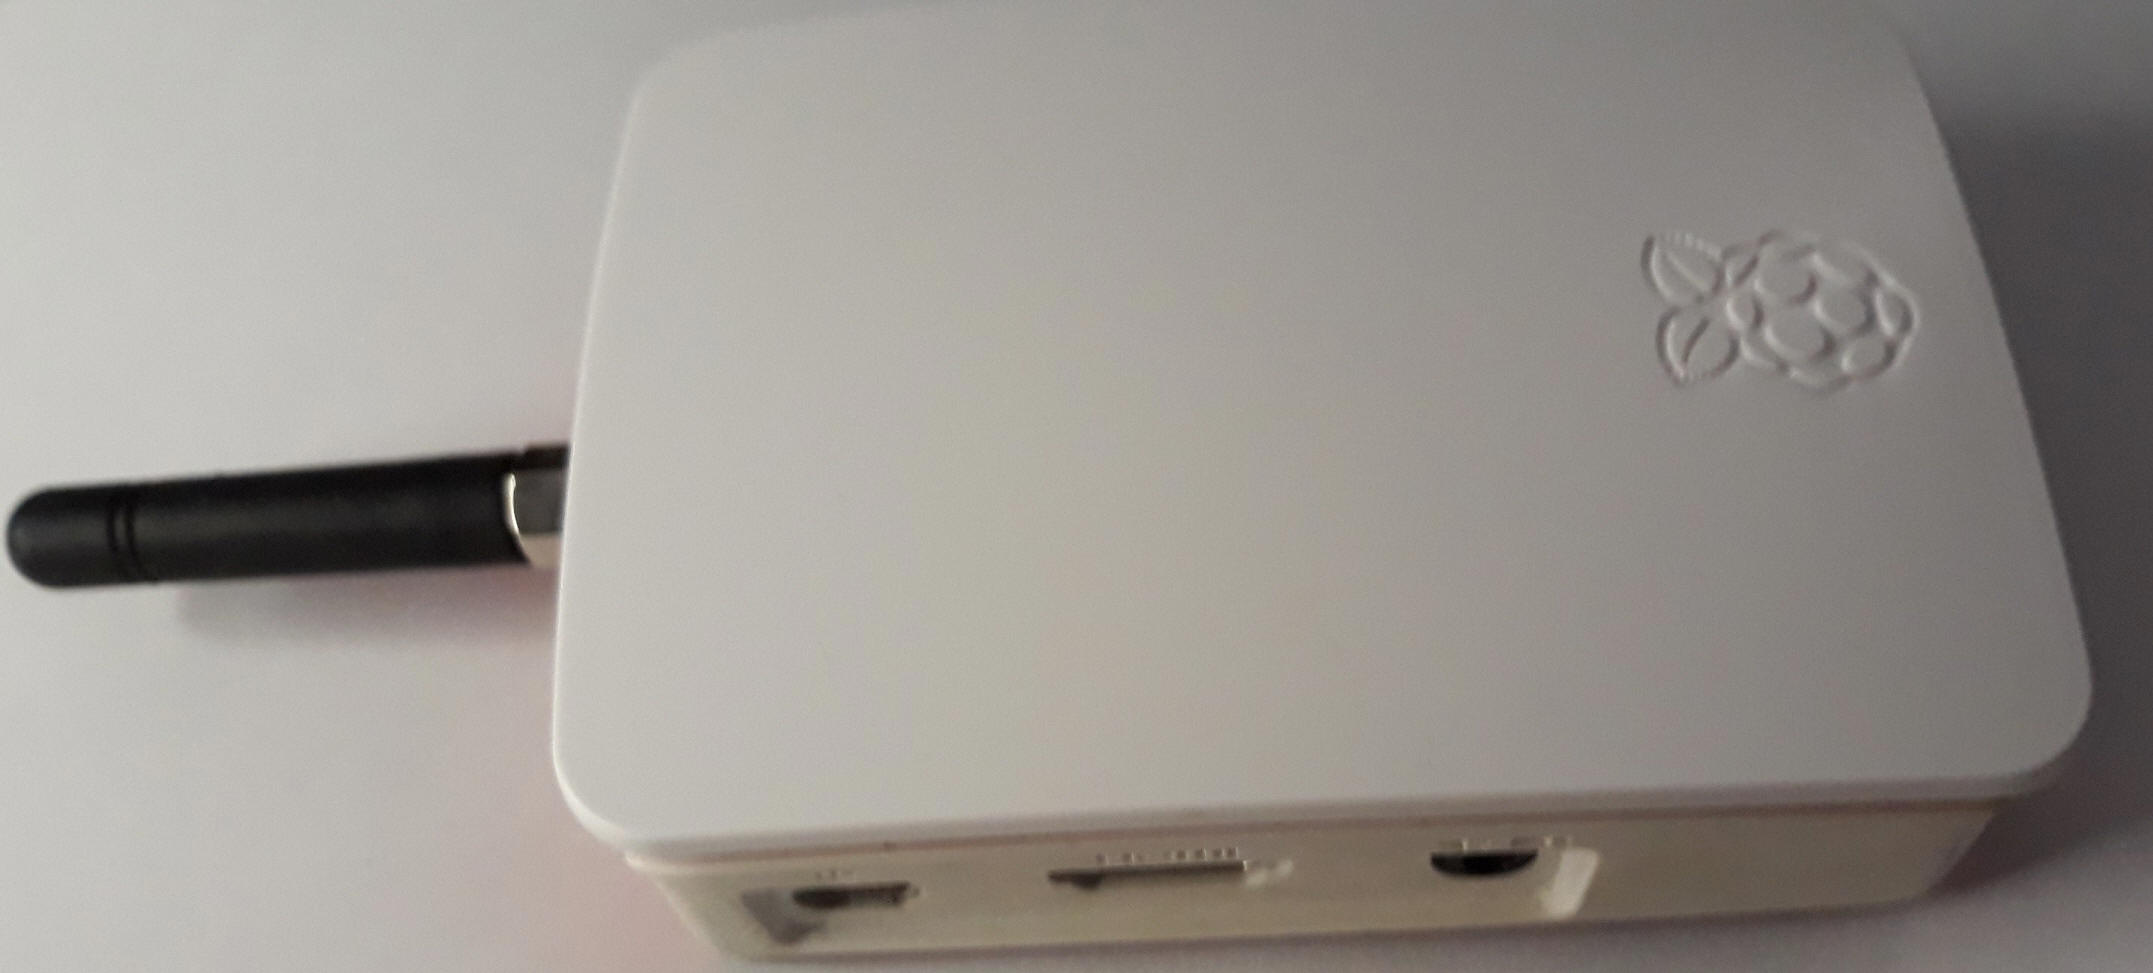
For sending only you will need a Raspberry Pi up to Version 3, or
a Pi Zero.
Attention: Raspberry Pi 4 does not work, because of
incompatibility with RPITX.Update: Pi 4 is now supported too.
Also a Pi Zero is not the best choice, because it is very slow and might cause
trouble in creating signal frames.
Plug a wire on GPIO 4, means Pin 7 of the GPIO header. This acts as the antenna.
The optimal length of the wire depends on the frequency you want to transmit on.
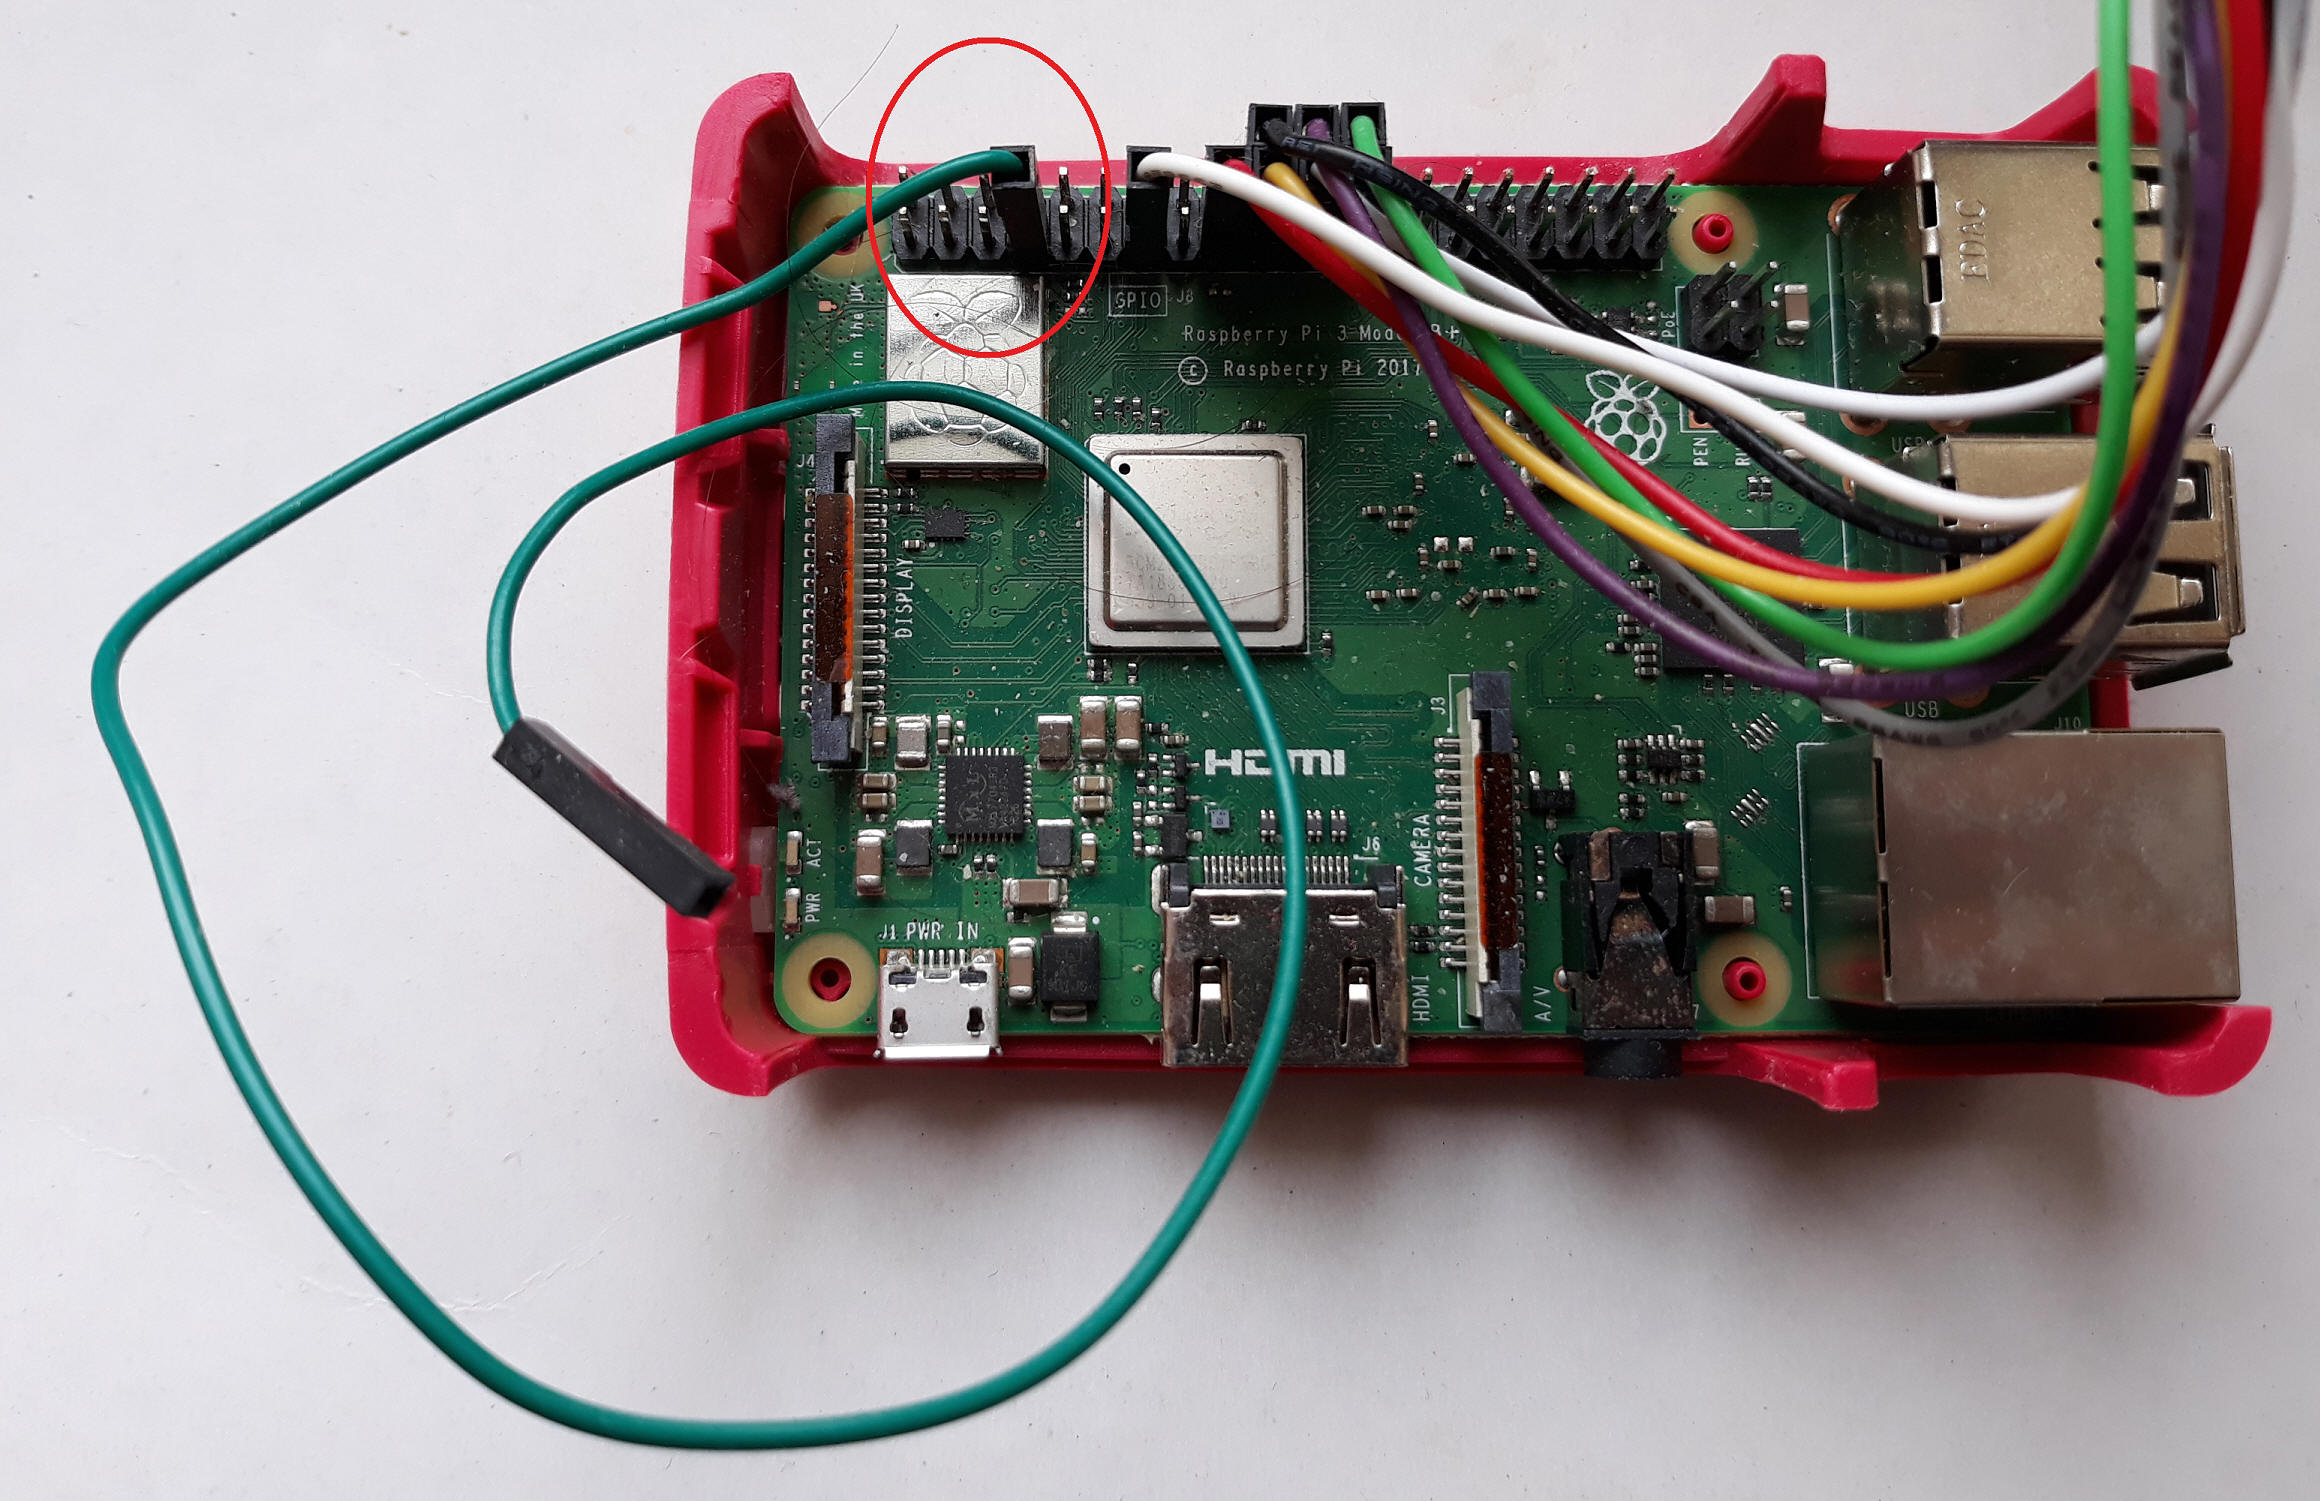
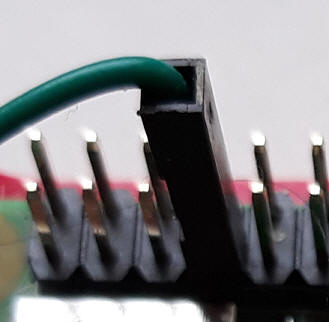
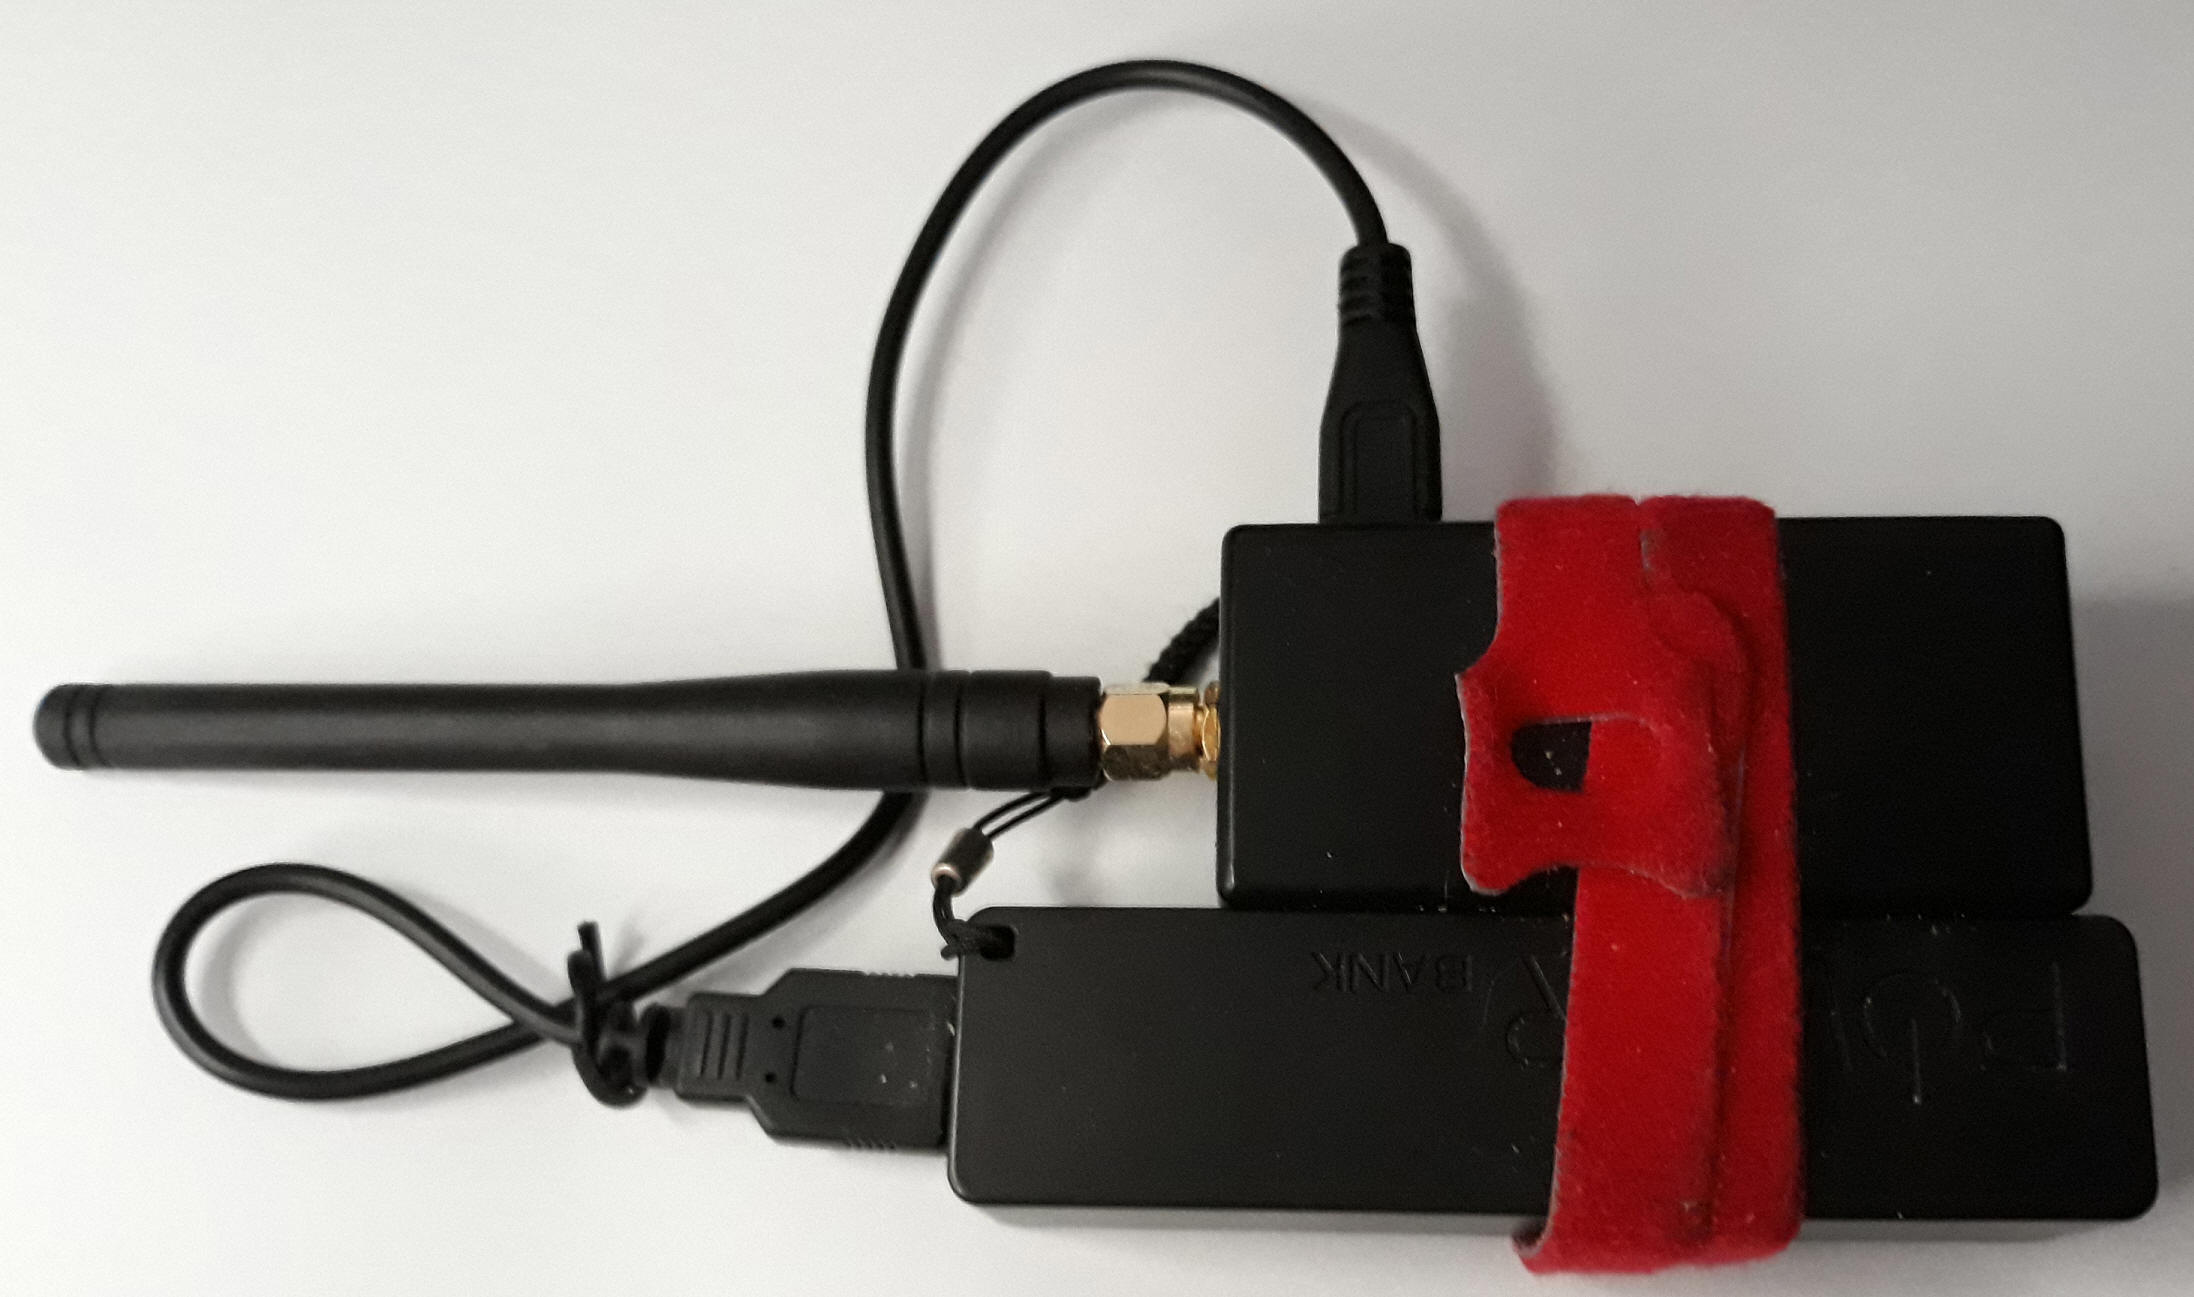
You can also add an external antenna like those 433 MHz antennas below:
Attention about sending signals
with Raspberry Pi:
In most countries it might be restricted to use the Raspberry Pi as a
sending device, especially on certain frequencies, because sending devices
usually need a governmental certificate for transmitting signals over the air.
According to my experience, these laws are working on a try and get caught
system.
So please check your local laws , and give your best to not get caught ![]()
Above does not apply for sending using a sending module for a specific frequency (like a 433 MHz module) or a CC1101 module.
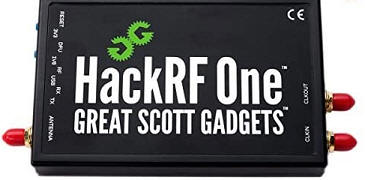
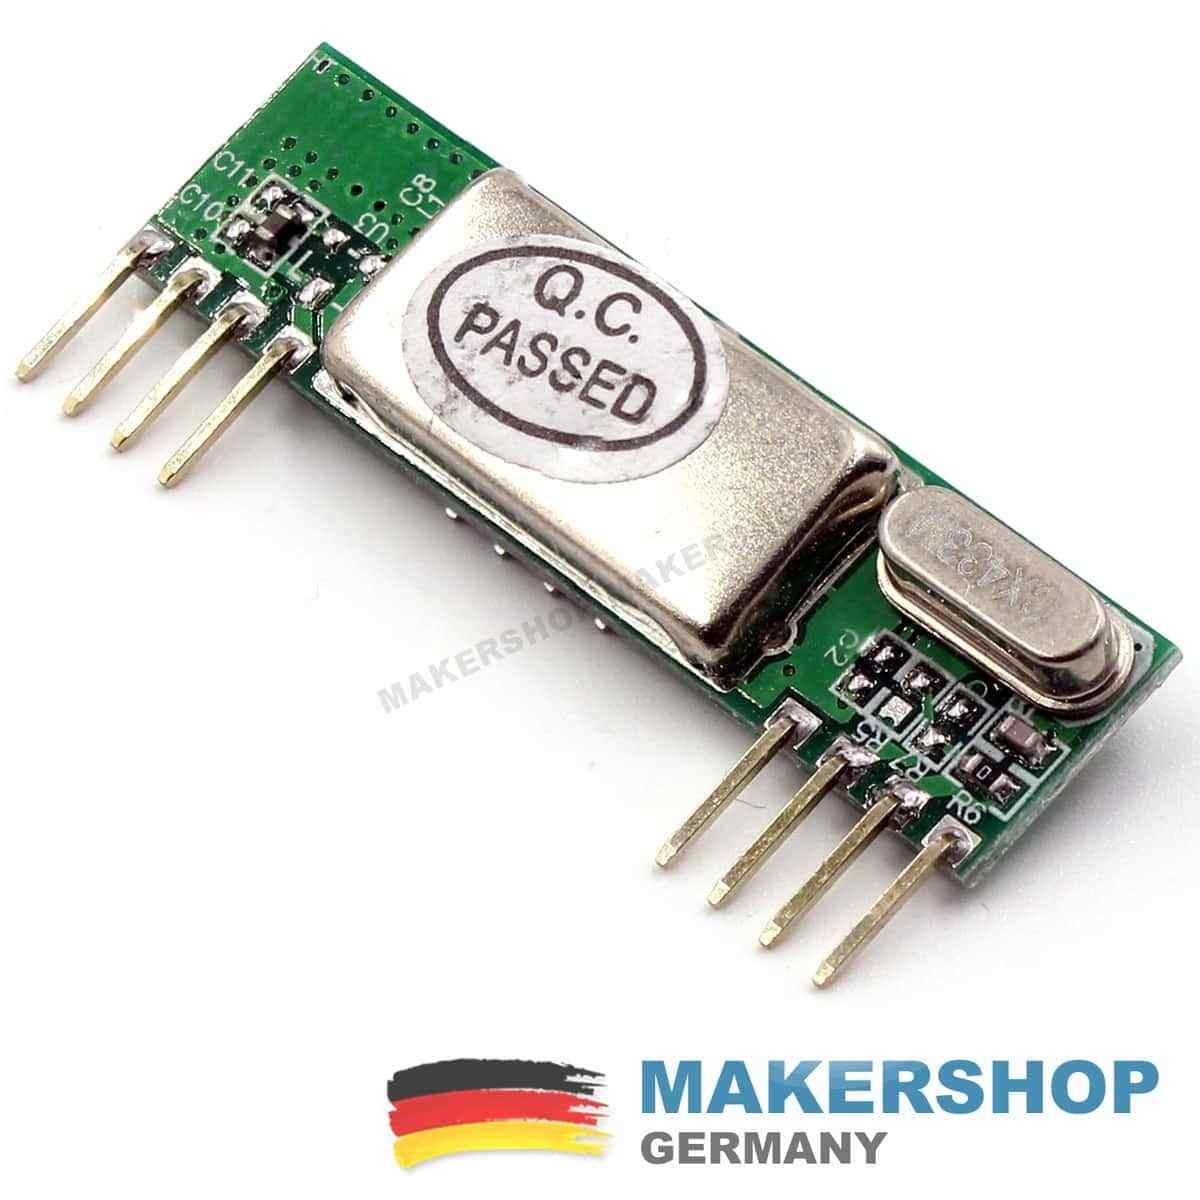
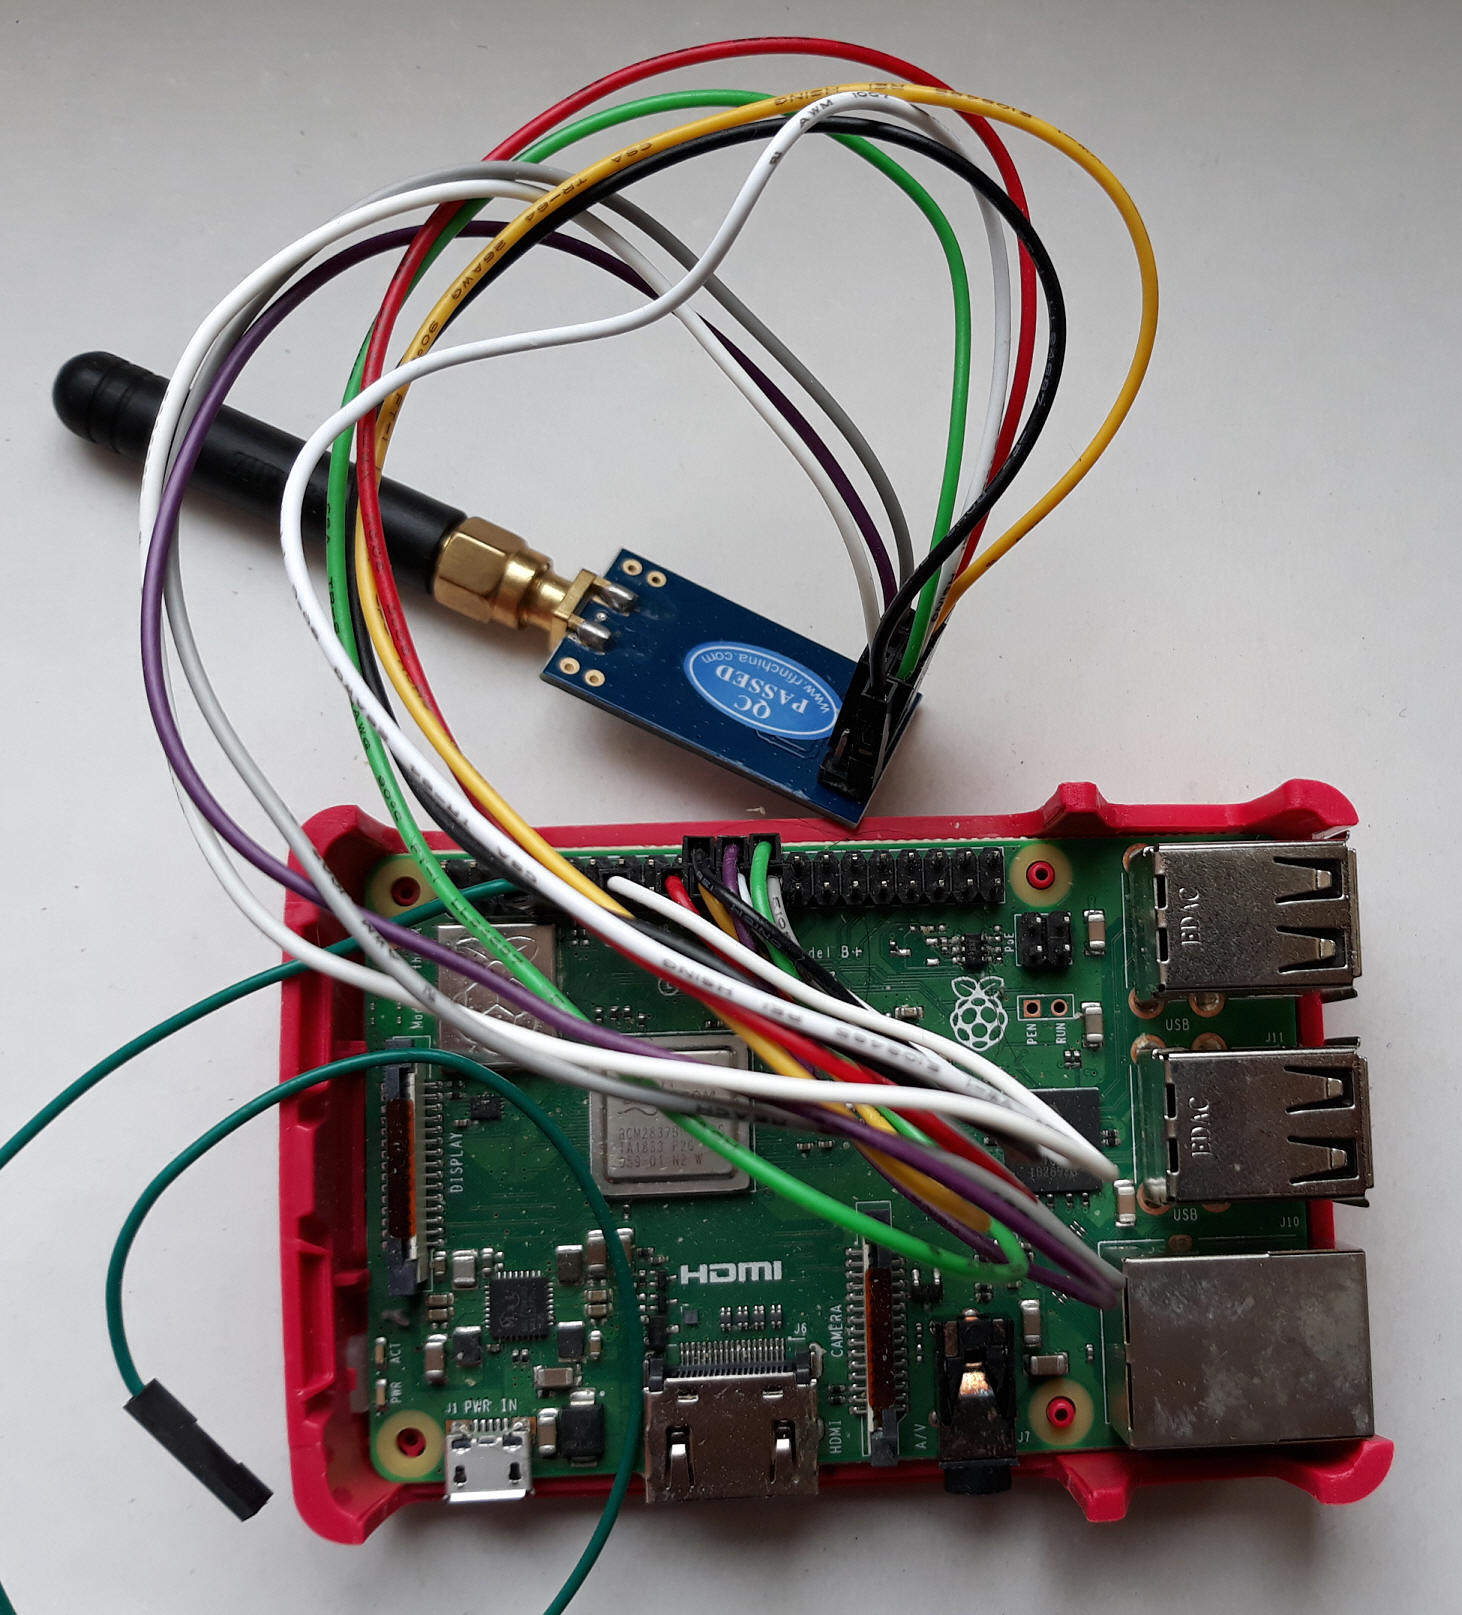
For receiving signals, you will either need a RTL-SDR Stick, HackRF One, or a simple 433.92
MHz Module working with 3.3 Volt,
and most recently you can also use a CC1101 module.

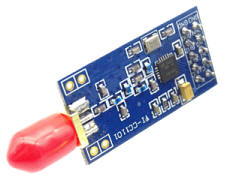
Sold out on Ebay:
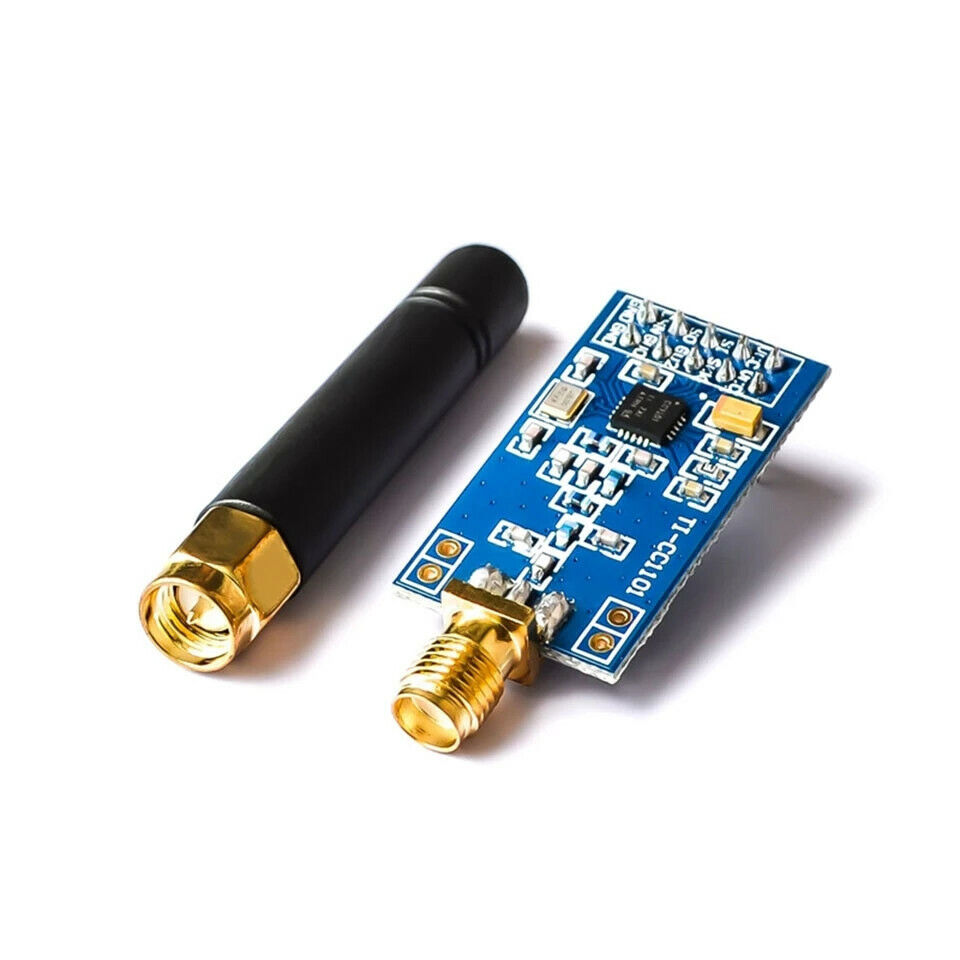
Attention for CC1101:
Do not purchase old version 1 modules which
have a green color and only 8 connectors!
Those modules have a very bad reception, and are a waste of money and time.
Only get new version 2 boards with blue color and 10 connectors!
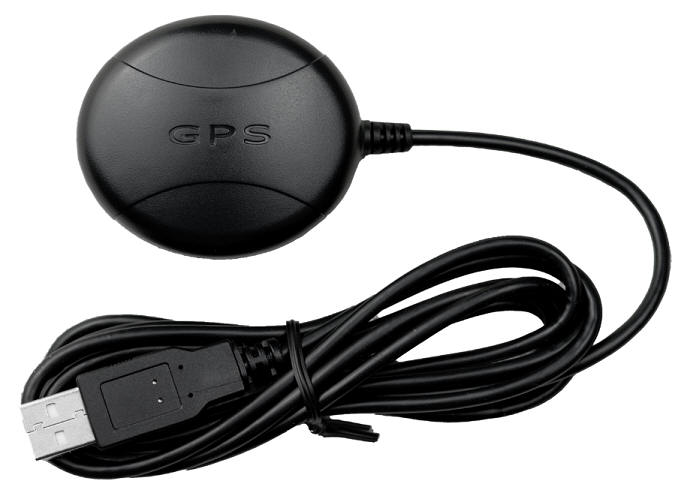
You can connect a USB GPS mouse to the Raspberry PI.
This is useful if you are driving around with a car, and catching signals while
driving.
Later at home you can see in the log file at what position and what time which
signal was captured.
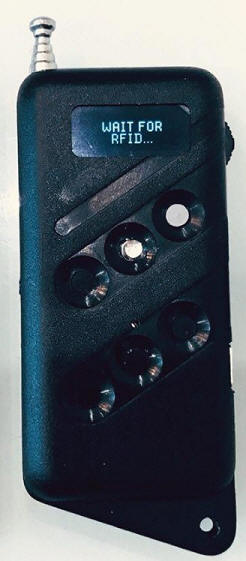
This is the best code grabber of it all. It captures Keeloq/Marantec/Horman
signals up to 100 meters right away.
I paid 300.- bucks for it. Nowadays they are trying to charge up to 1000.-
bucks, which is ridicules.
Worst grabber of it all !
For Keeloq signals you have to press the remote button twice to capture
the signal, so this grabber is not really satisfying for capturing foreign
signals!
Do NOT buy this one!
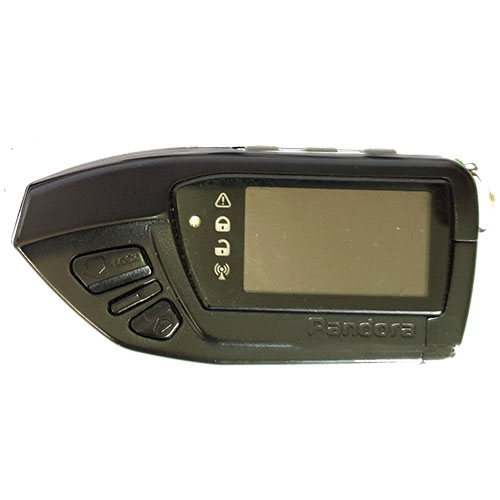
Be careful with those.
There are some Pandora grabbers named as version 2.4, with a price range of
1000.- to 2000.- bucks,
which are using a public free firmware, and are not able to handle interesting
remotes.
They mainly handle only Russian car alarm systems.
The other Russian Pandora models with a price range from 5000.- bucks and above, could be interesting, but only if you want to steel cars.
| CC1101 module | Raspberry Pi | Pi Pin Nr | Wiring Pi |
|---|---|---|---|
| VCC | 3V3 | 17 | |
| GND | GND | 20 | |
| GD2 | GPIO25 | 22 | 6 |
| GD0 | GPIO27 | 13 | 2 |
| CSN | SPI_CS0 | 24 | |
| SI | SPI_MOSI | 19 | |
| SO | SPI_MISO | 21 | |
| SCK | SPI_SCLK | 23 |
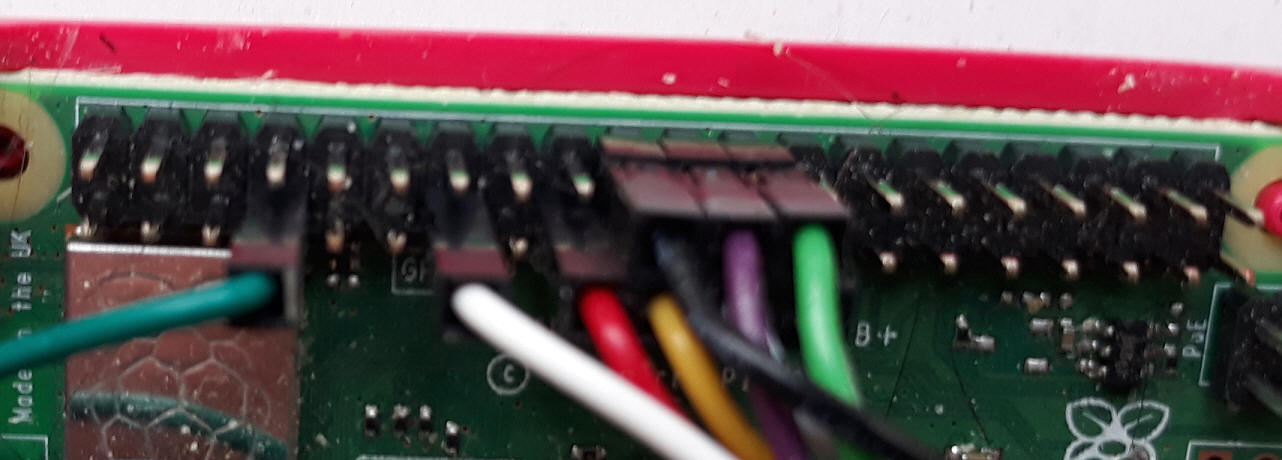
Note: The CC1101 can be used for
receiving and sending!
Sending works now for AM and FM signals.
Official
CC1101 Frequency bands: 300-348, 387-464, 779-928 MHz.
If the sending frequency does not fit into one of the CC1101 frequency bands,
RPITX will be used automatically for sending.
In the config file: /home/pi/rf/rfcomm-server-cfg.ini you can enable the usage of this module, by setting the receive and sending pin to which you have connected GD2 and GD0 of this module:
[PIN_SETTINGS]
RecievePinCC01=6
RecievePinCC01Name=CC1101
CC1101InitFreqConfig=1
TrsnmitPinCC01=2
TrsnmitFreqRangeLo=432000000
TrsnmitFreqRangeHi=900000000
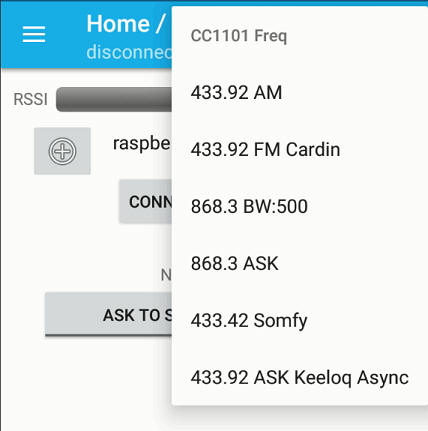
The configuration: CC1101InitFreqConfig=1 uses a predefined frequency setting for the CC1101 at startup.
0 = 433 MHz optimized for Keeloq
receiving
1 = 433 MHz FM optimized for Cardin FM Keeloq receiving
2 = 868.35 MHz with 500 Hz Bandwidth
3 = 868.35 MHz with 125 Hz Bandwidth
4 = 433.42 MHz for Somfy receiving
5 = 433 MHz optimized for sensitivity
6 = 310 MHz
7 = 315 MHz
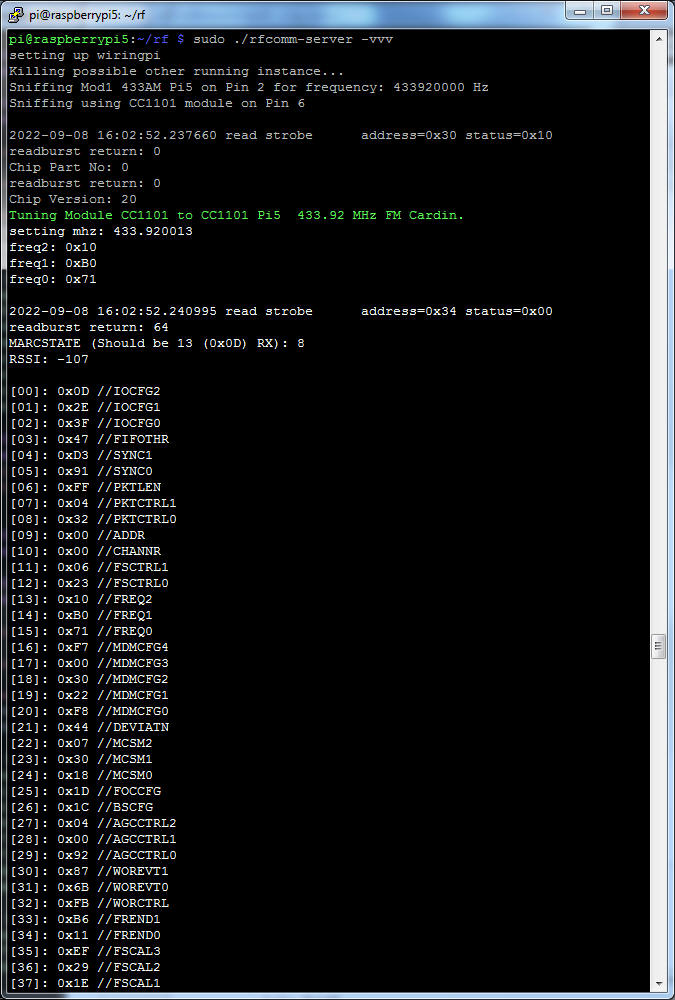
Testing if the CC1101 module is working properly:
Start the Pi module, and you will immediately see that the CC1101 module gets tuned to the given frequency, and its registers get read and printed:
With the Android App, you can switch to a different configuration at any time:
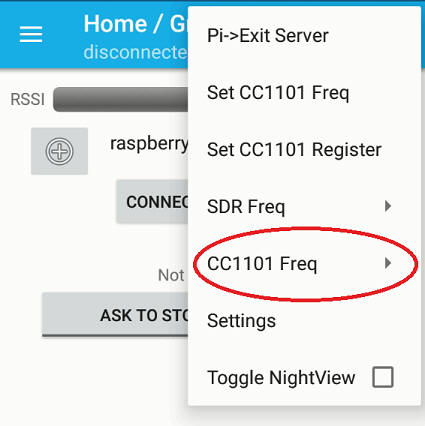
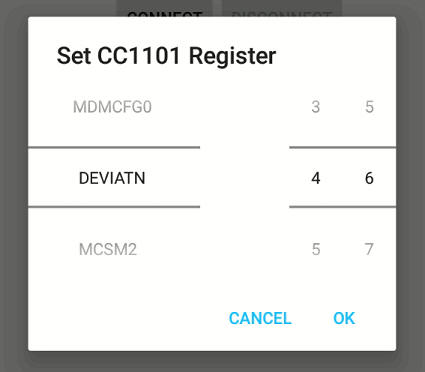
The Android App also offers Menu-Entries to set a free chosen frequency, and to play around with the CC1101 registers:
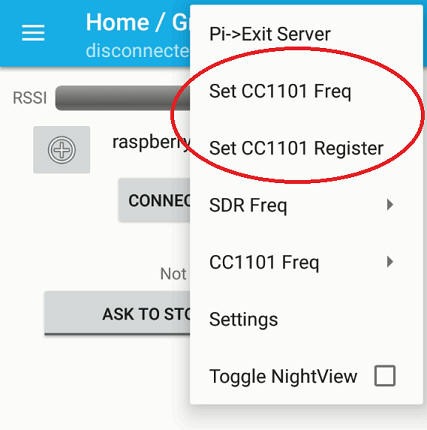
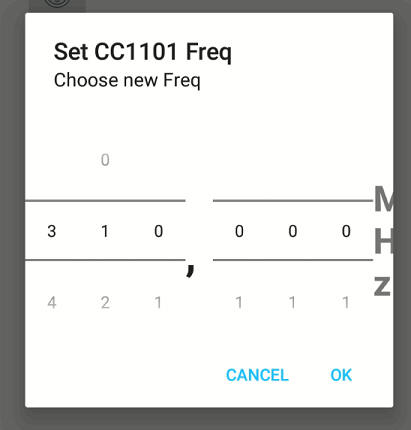
Attention!
There is no check if the chosen frequency is valid within
the valid range of the CC1101 module!
Make sure you are choosing correct operating frequencies!
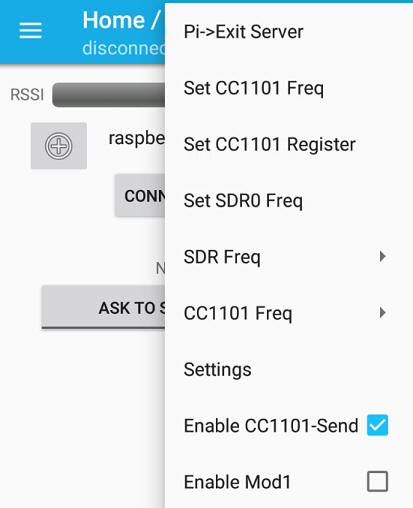
New feature added in version 1.5:
Using the CC1101 module for
sending can now be enabled/disabled at any time:
(If disabled, RPITX is used for sending)
| Transmitter | Receiver | Raspberry Pi | Pi Pin Nr | Wiring Pi |
|---|---|---|---|---|
| VCC | VCC | 3V3 | 1 | |
| GND | GND | GND | 6 | |
| DATA | GPIO17 | 11 | 0 | |
| DATA | GPIO18 | 12 | 1 |

You can connect up to 3 different
modules using different frquencies for receiving.
In the config file: /home/pi/rf/rfcomm-server-cfg.ini you can enable the usage
of these modules, by setting the receive pin to which you have connected DATA of
each module:
[PIN_SETTINGS]
RecievePin1=1
RecievePin2=-1
RecievePin3=-1
RecievePin1Name=Mod1 433AM
RecievePin2Name=Mod2 433FM
RecievePin3Name=Mod3 868
RecievePin1Freq=433920000
RecievePin2Freq=433920000
RecievePin3Freq=868300000New in version 1.4:
You can connect up to 3 different
modules using different frquencies for sending.
In the config file: /home/pi/rf/rfcomm-server-cfg.ini you can enable the usage
of these modules, by setting the transmit pin to which you have connected DATA of
each module:
TrsnmitPinMod1=0
TrsnmitFreqMod1=433920000
TrsnmitPinMod2=-1
TrsnmitFreqMod2=868300000
TrsnmitPinMod
Due to a lot of abuse, the
Android App is no longer free.
It can be purchased in different bundles, and includes all further
updates.
You can use paypal or Bitcoin:
![]()
You will receive a download link for the
Android App by email.
Because this process is not fully automated yet, it might take a while to
receive this email.
Also please check your bulk/spam folder if the email went there!
If you purchased the basic version, you will have one
Brand/Vendor included for free.
Each further Brand/Vendor can be purchased for 5.- US$ here.
This App is programmed to work with Android
versions 4.2 (Jelly Bean) and up, and is confirmed to work until version 11.
If you can confirm upcoming newer versions of Android, please let us know.
Refund policy for the App:
Once the App has been delivered, no refund will be issued at any time.
Refund policy for single remote vendors:
If the purchased vendor-system will not work for your garage/gate/car,
you can ask for a refund.
The App is using permissions for Bluetooth, GPS location, write to external storage and phone accounts.
The permission for phone accounts is needed to retrieve the main email address
of your phone,
which will be used to authenticate to our servers, so you don't need to create a
login and password.
Your other phone-contacts are never accessed by this app at any time!
GPS is used for many features which are provided by this app.
Bluetooth is needed to connect with your Pi.
Write to external storage is needed to backup and restore the database of your
created garages/gates/cars.
You can also qualify for free vendors or full access in providing missing manufacturer keys or entire rolling code systems.
Download the given zip file. Unzip the APK file inside, and transfer it somehow to your phone, either by using Bluetooth or USB file transfer.
In your Phone settings you will need to enable the option: Install unknown Apps in Security settings.
or check out this web-site for more info: https://www.lifewire.com/install-apk-on-android-4177185Now locate the APK file with a file manager on your Android-Phone, and click on it to have it installed.
Setting up the Raspberry Pi is explained on a separate page here.
To copy your own remote, connect a RTL-SDR device or HackRF One to your Pi, and
start my module on the Pi.
Then start the Android App, and connect with your Pi.
In the up right Menu, choose to set the listening frequency for the RTL-SDR
device, and set it to the frequency of your remote.

The App will now be listening for recognized signals, so press the button of
your remote control.
In my case, I am pressing button 1 of my Nice Flor 433.92 Mhz:
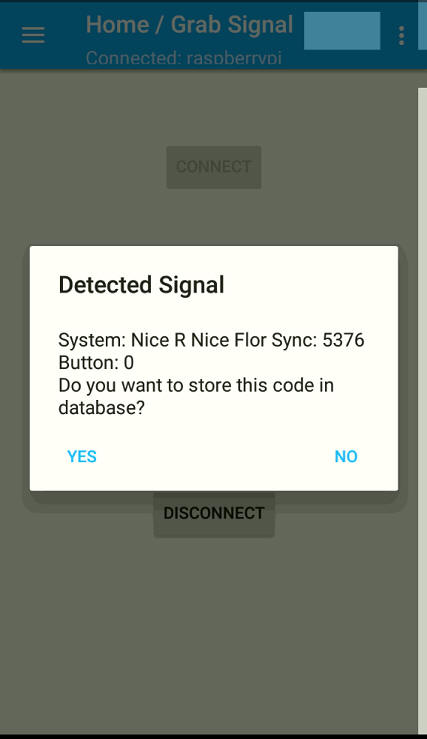
The App will detect the signal, and send it to the server to decode the encrypted values of the remote, and ask you if you want to store it to your database.
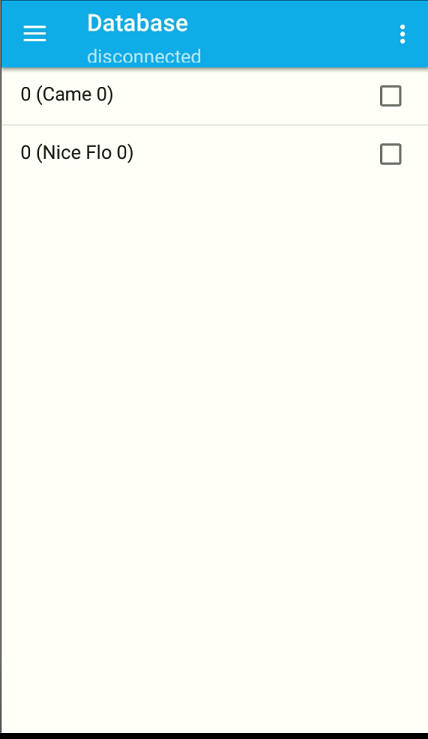
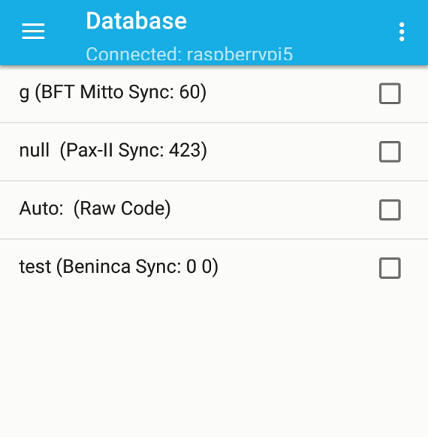
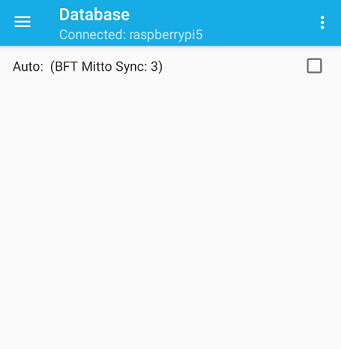
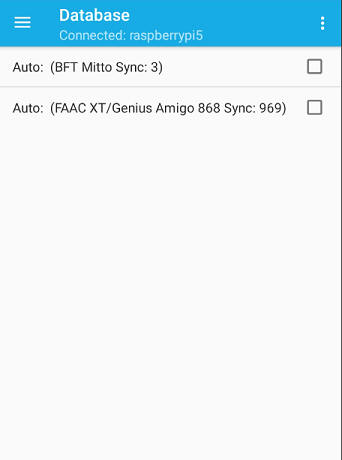
In the Database-View you can see all your stored remotes:
If you have chosen to auto-store new signals, the word "Auto" will be put in
front:
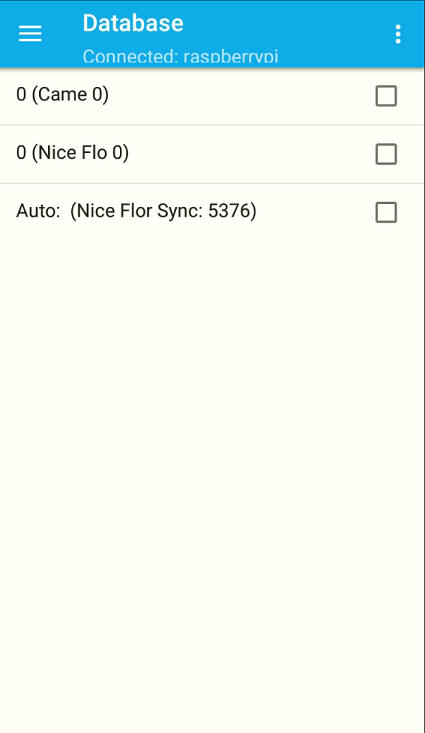
If you press short on a database entry, the app will send the signal of the stored remote to open the garage if your Pi is connected.
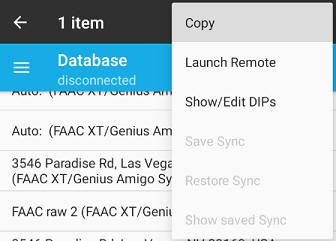
To edit/delete the database entry, press and hold the desired entry, and an
action menu will appear and allow you to edit or delete an entry,
and depending on the vendor, more options may appear.
As example we will be creating a "Beninca" remote manually, which is using Keeloq-Rolling-Code:
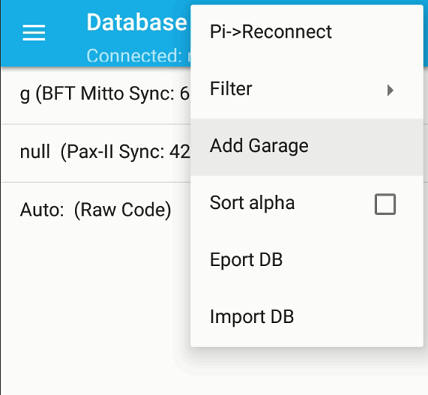
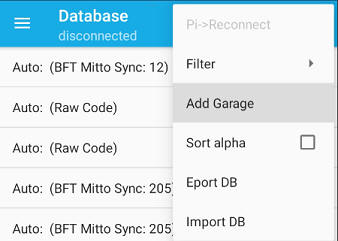
To create a Keeloq remote manually, go to the Database-View and choose the Menu-Entry: "Add Garage":
In the Address-Field you can name the remote to anything you like. Lets name it "test"
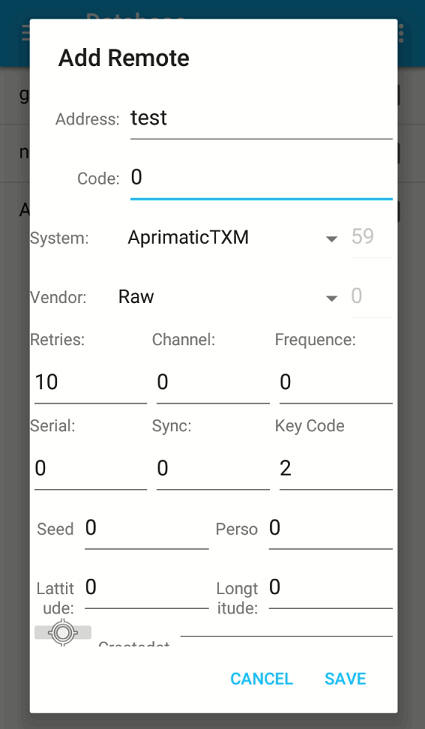
As System choose "Keeloq" :
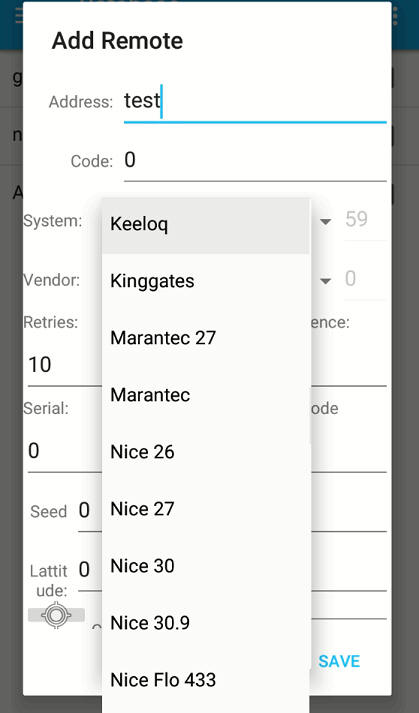
As Vendor choose "Beninca"
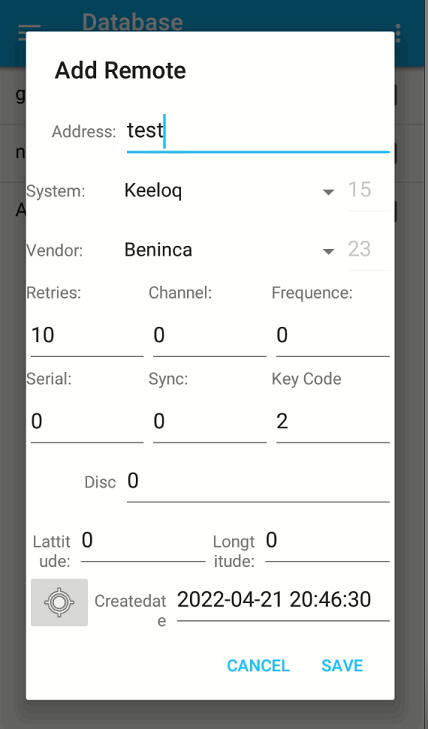
Leave the fields "Retries", "Channel" and "Frequence" as they are.
The Pi-Module will use the stored default frequency for this remote
automatically.
If you would like to use a different frequency like 868.5 MHz, you would enter:
868500000 in the "Frequence" field.
The important values are now "Serial", "Sync", and "Key Code".
Give your "Beninca"-Remote a new serial like 12345:
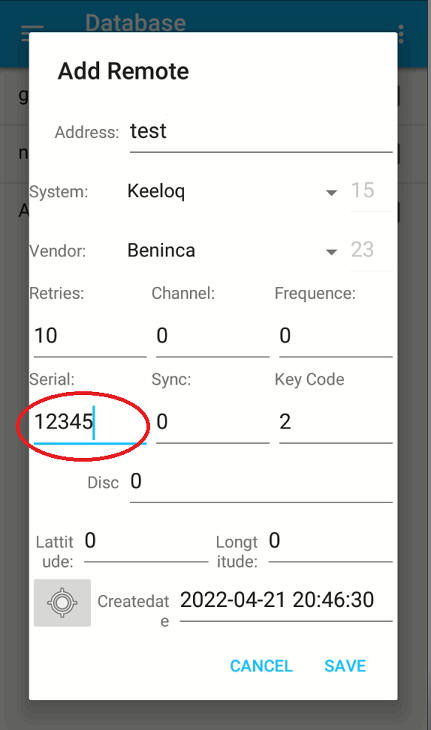
The Sync value will stay at 0 for a new remote.
This value will increase in future with each button press of the remote!
You can leave the "Key-Code" at 2, which is the default for Button 1 of a
Beninca remote.
(Different Vendors are using different Key-Codes. Ask if you require further
help)
Save this new entry, and you will see it in your database:
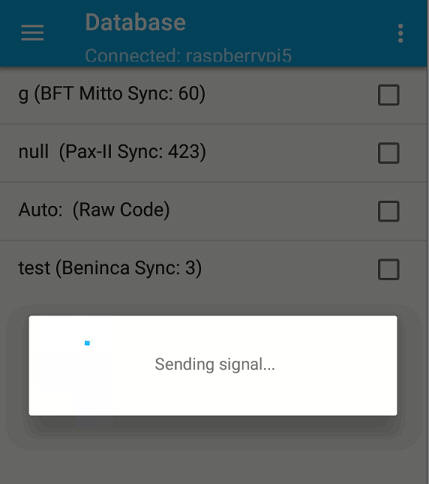
If you are connected with your Pi, and press this new entry, a new rolling code
will be generated by the server, and sent by the Pi:
New in version 1.4: For rolling code vendors, five signals will be generated and
stored in the app for offline usage!
To open your door, first you have to "learn" this new remote to your receiver.
Press the learning button on your receiver, and then press the new entry in the
database to send the new signal.
(For the "learning" process, it could be useful to increase the "Retries" value
of how often the signal sending should be repeated. Set it to 20, and restore it
to 10 once the learning is completed.)
This new remote will be stored in your receiver, and open your garage/gate/car
from now on.
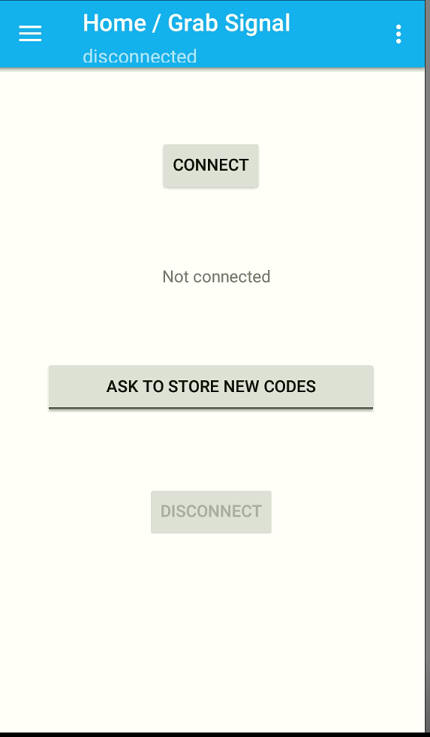
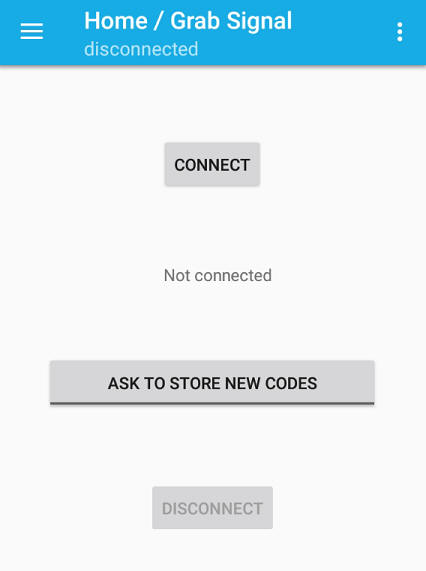
In case you have lost all of your remotes, and can't enter your garage, you can use brute forcing to find the correct code and open your garage again.
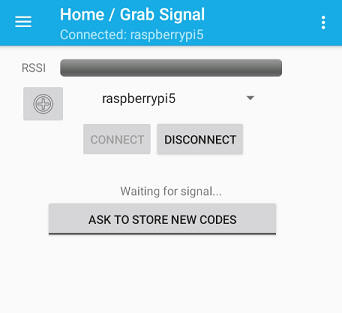
First go the main Page "Home / Grab Signal", and connect with your Pi:
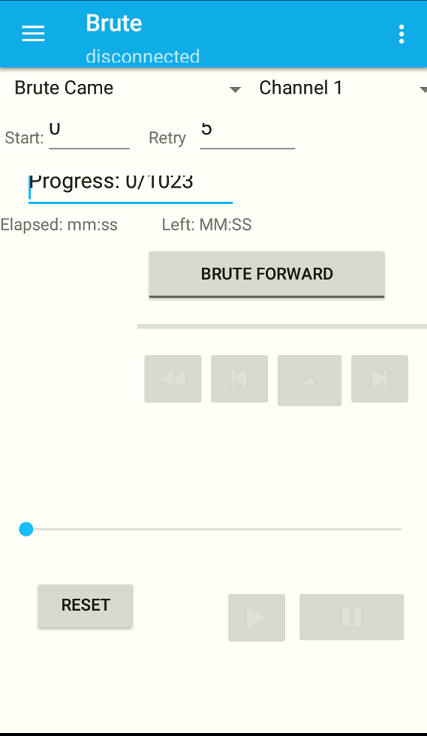
Change to the Brute page, and select the System you would like to Brute.
Came is very common and widely used:
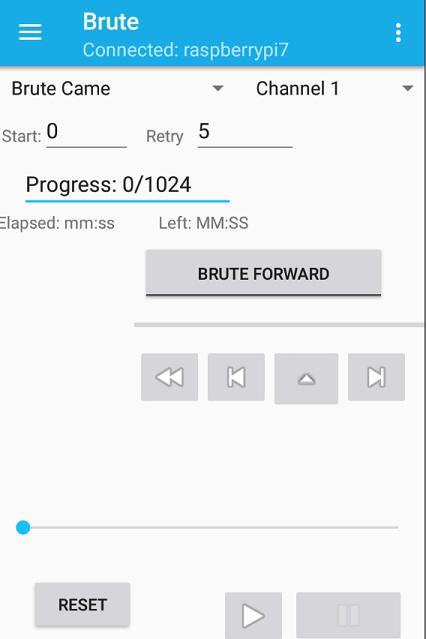
Press the "Play Button" to start the Brute process.

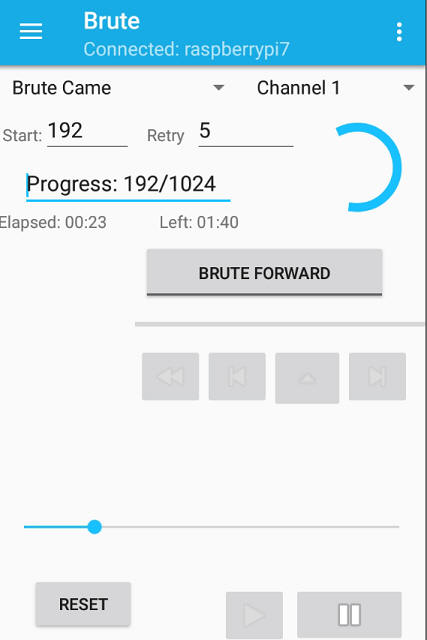
The bruting will start and display the current progress and estimated time:
When the door/gate/barrier is opening hit the Pause/Stop Button:
![]()
If it's a door that's closing after a certain amount of time
automatically, wait until the door has closed.
At this time you still don't have the correct code to open the door, but you are
close.
Now either hit the Back button
![]() manually a few times,
until the door opens again,
manually a few times,
until the door opens again,
or use the reverse button
![]() which will brute
backwards but not so fast,
which will brute
backwards but not so fast,
and wait until the door opens again.
Wait until the door has closed, and use this button
![]() to send the same code
again.
to send the same code
again.
If the door does not open, adjust by using the Next and Previous Buttons until
the door opens.

![]()
Due to an Android Bug, it can happen that the Bluetooth
connection gets lost at this point.
For this case a Reconnect Button will show up:

Use it to finished the job.
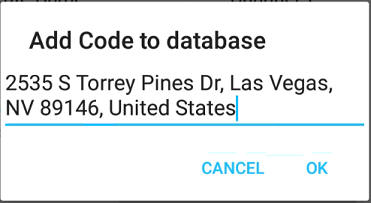
Once you have the right code, you can save it to your database
with the menu entry "Add Code to DB":

My App will automatically select the current address using GPS and street data from Google and recommend its name for the database entry.
In the database Page you can edit this new garage entry as you like:
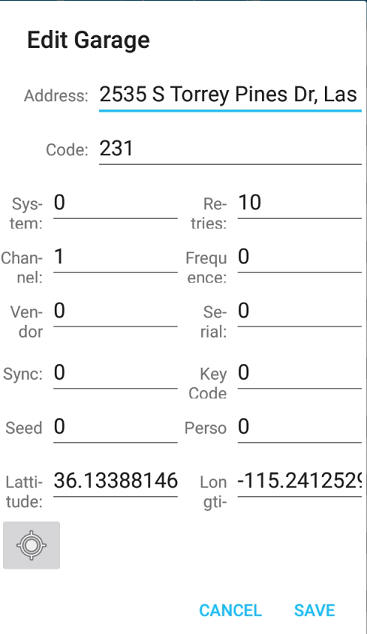
This Button
![]() will update the GPS
coordinates at any time.
will update the GPS
coordinates at any time.
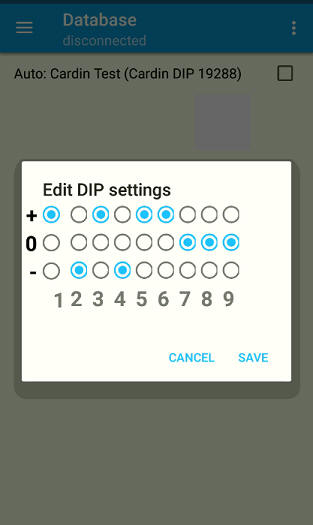
With the menu "Edit DIP", you can see what DIP settings have been or need to be used by an original remote:
In the Map View, you will be able to see a Marker for your new added address.
If you are connected to your Pi and click on this Marker, my App will send the signal to open the garage door.
New feature added in version 1.1:
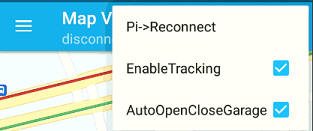
If the Map View is open, and position tracking and
AutoOpenCloseGarage is enabled, Garages that you approach within a distance of
50 Meters will be opened automatically,
without the need to press any button.
The App must be connected to the Pi using Bluetooth, and must have an internet
connection.
New feature added in version 1.1:
Now you can edit / view the DIP Settings of your original Remote:
You can reach this option in the Database View, by selecting an entry and choosing the action menu item: Show/Edit DIPs:
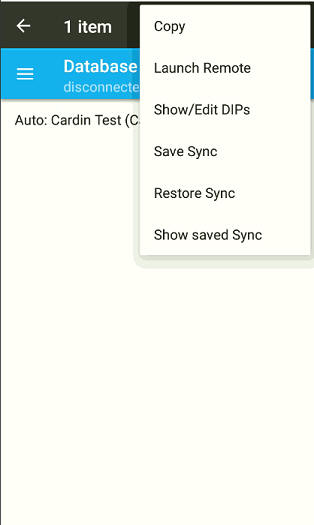
New feature added in version 1.4:
Now you can add / learn
new "remotes" remotely to a receiver with 1 click:
(This is working only if a remote learning feature is supported and
enabled by the receiver!)
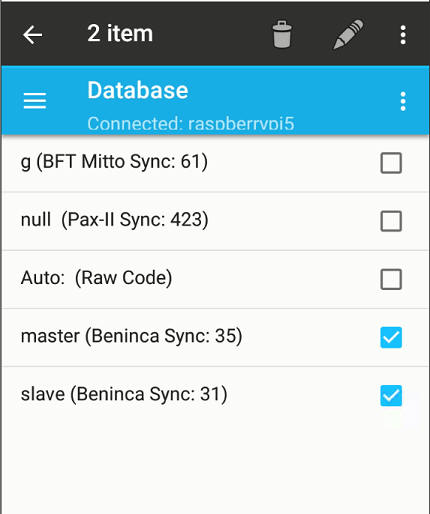
In the database view,
select two Entries with the same brand/vendor.
The first selected entry will be the "Master"-remote, and the second will be
your new "Slave"-remote, which you want to add.
(The Master-remote must be already working with the receiver!)
In this example, the brand Beninca will be
used:
Make sure "master" and "slave" do have different serial
numbers in your database!
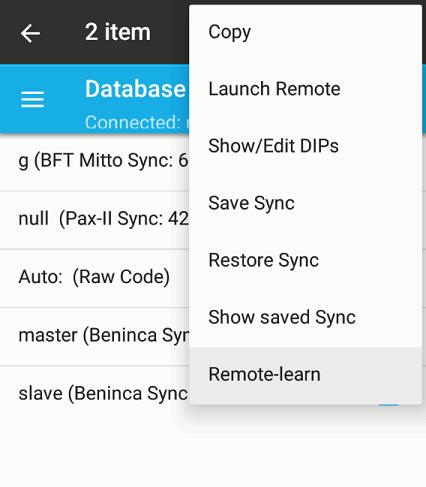
From the action menu, select: "Remote-learn":
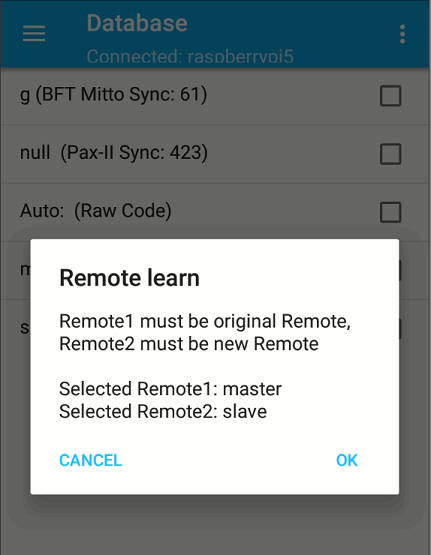
You will get a reminder-dialog, which will also show the two selected entries:
Another dialog will show the standard
procedure to learn a new remote for this brand / vendor:
(This is just for your information)
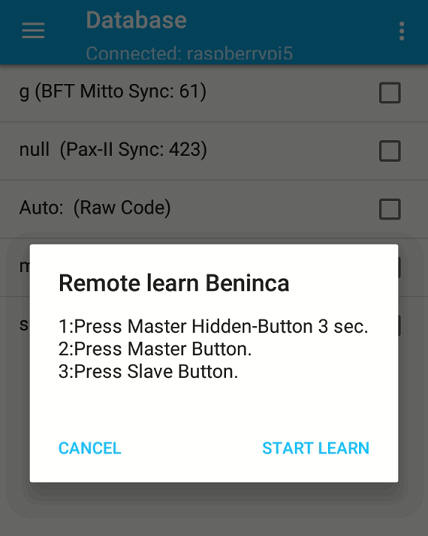
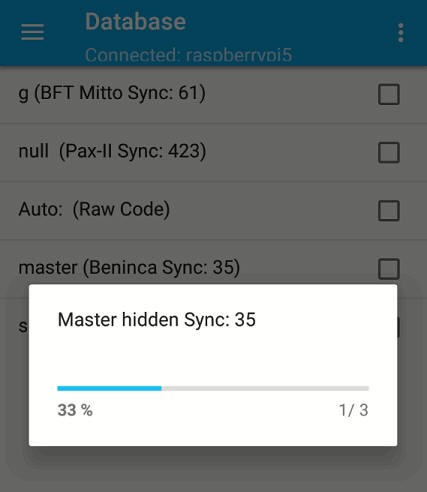
After clicking on "START LEARN", the learning process will do everything automatically:
Here the hidden button of the "Master"-remote will be pressed for 3 seconds:
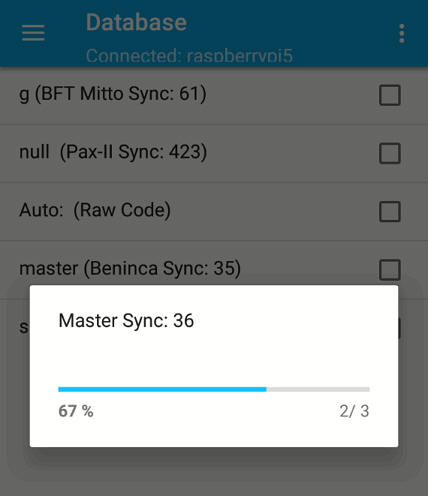
Now the button which should be used will be pressed on the "Master"-remote:
Finally the same button on the "Slave"-remote will be pressed:
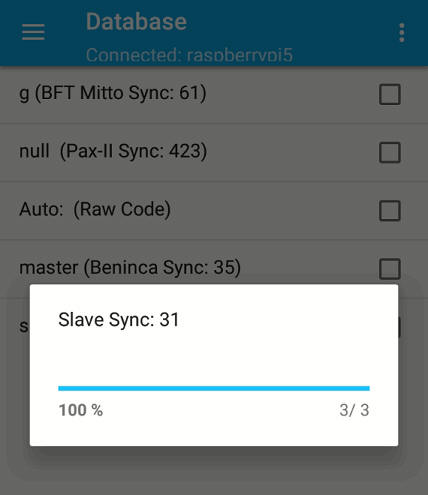
Depending on the brand, wait 5 seconds up to one minute, until the receiver ends the programming procedure, and your new remote should open the door.
New feature added in version 1.4:
Now you can submit a brute force request to the server, to recover the Seed-Code of your remote.
At first, please follow the
guide to get a remote signal into the database:
Cloning/Copying/Grabbing a Remote Control into the database
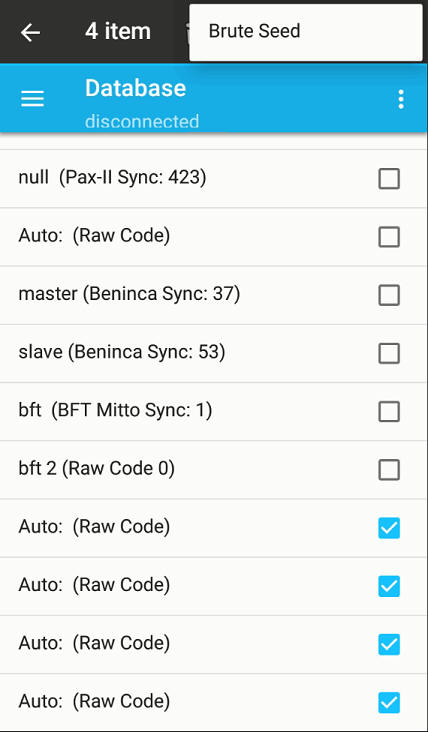
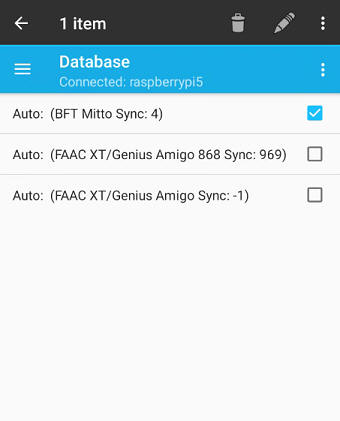
Copy between 2 or 4 signals into the database like below:
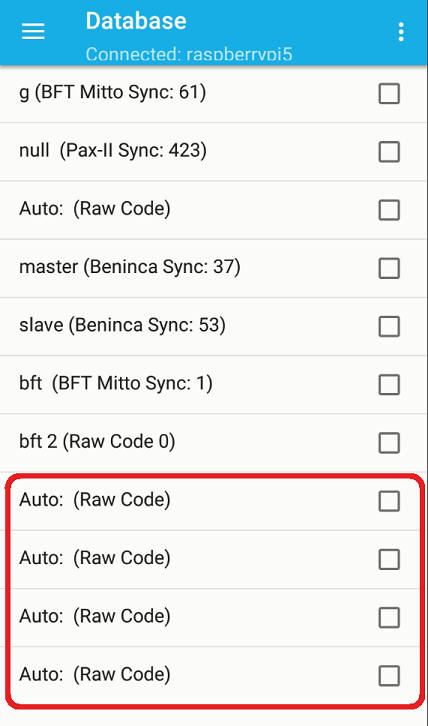
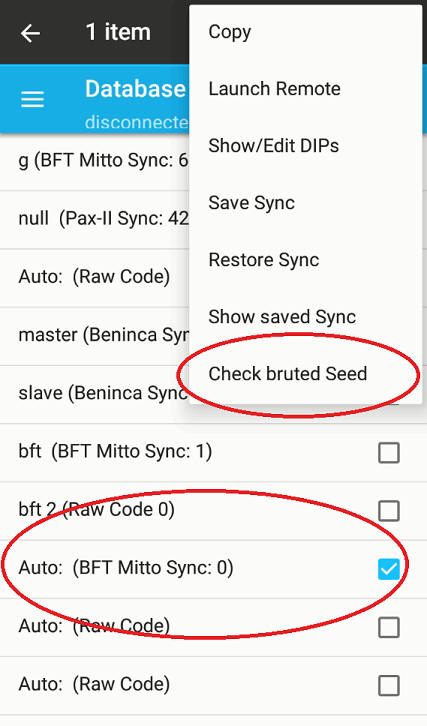
Select the new entries, and choose on the top right action menu: "Brute Seed":
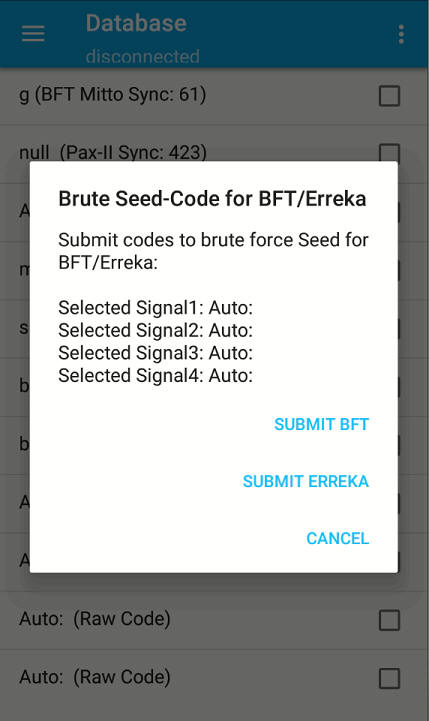
A Dialog will appear and ask if it is a BFT or Erreka remote:
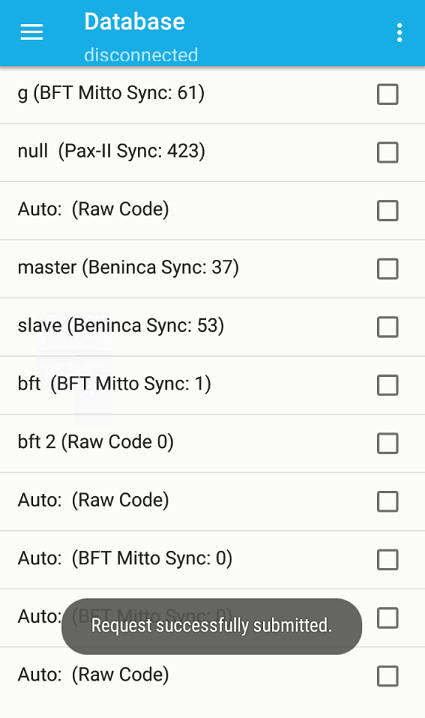
After selecting BFT or Erreka, a short message will tell you if the request was successfully transmitted:
At this point, give the server
some time, and later you can check at any time if the bruting was successfull:
Select any of your copied signals, which was already changed to the selected
brand/vendor (BFT in this example),
and choose from the action menu: "Check bruted Seed":
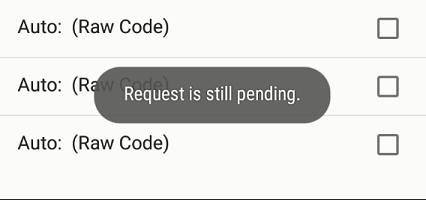
If your request is still pending, you will see this:
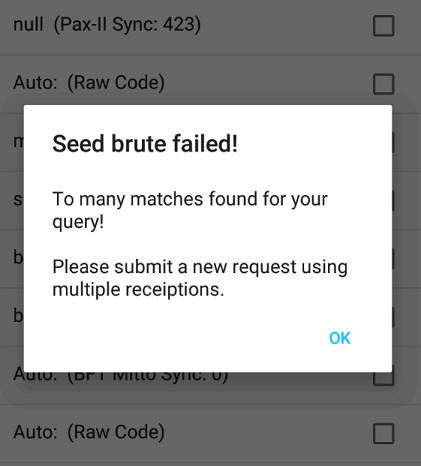
Sometimes it can happen that
multiple possible seed-codes matched at bruting-time.
In such cases, please repeat all steps above with new copied signals, and repeat
the bruting request:
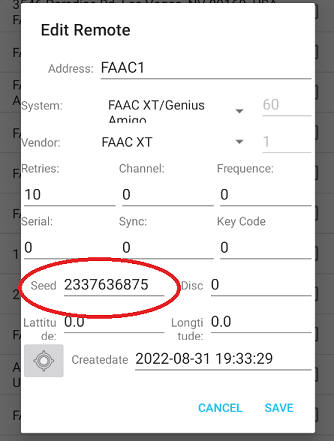
If the seed was successfully recovered, you can store it to your database entry with a click on "STORE":
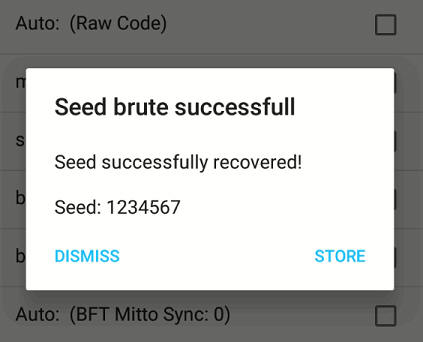
If the seed is correct, the copied signal will be decoded and updated in the database:

If you check your database entry, you can see the recovered seed:
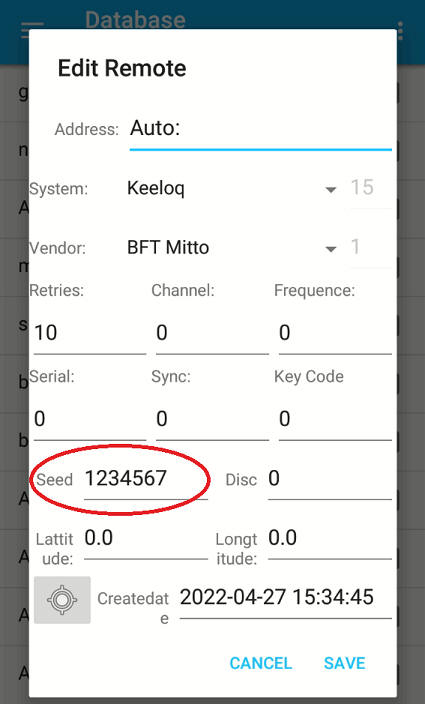
This new entry should now open your door/gate/barrier :)
New feature added in version 1.4:
Copying a BFT remote is special, because it is using a SEED code, which needs to be transmitted prior the actual copying process.
Start the App and connect with your Pi:
If your Remote has a hidden button, press the hidden button, otherwise keep pressing button 1 and 2 until the Seed-Code has been received:
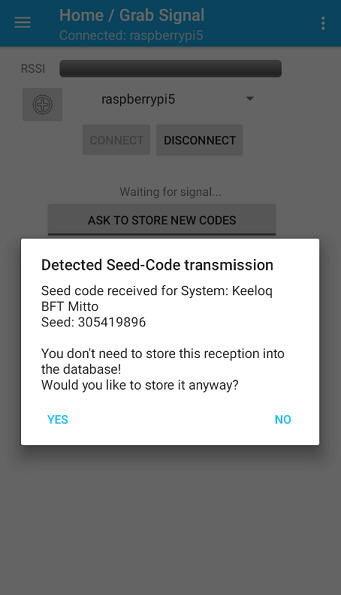
At this point, the Seed-Code will be stored for all future receptions, until another Seed-Code reception is detected, or a Seed-Brute-Force gets requested.
Now press the button of the Remote, you would like to copy:
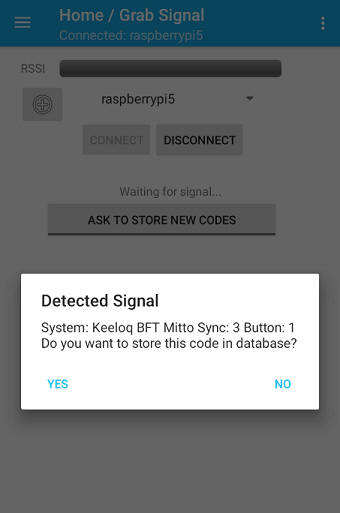
Your remote will be detected, and the signal decoded using the last stored SEED.
Now you can store it to the database:
Clicking this entry will open your door/gate/barrier.
To copy this remote to a
remote-cloner device, or to learn it into a receiver, you will need to transmit
the Seed-Code first.
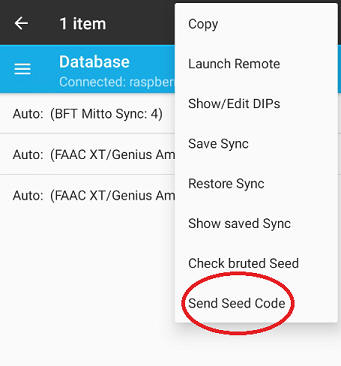
You can do this by selecting the database entry, like you would like to edit it:
From the action menu choose: "Send Seed Code":
The Seed-Code will be transmitted for 3 seconds:
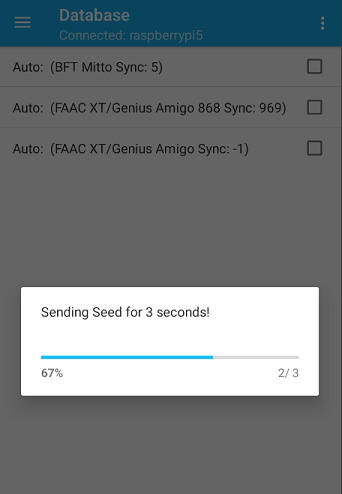
After this, press the database entry to send the button signal of this remote, and it is learned to the receiver or copied to a cloner.
New feature added in version 1.4:
Start the App and connect with your Pi:
For FAAC / Genius Amigo, you will have to repeat these steps for each button:
Press button 1 and 2 until the
LED of the remote starts flashing.
Now press the button, which you would like to copy, to transmit the Seed-Code of
this button:
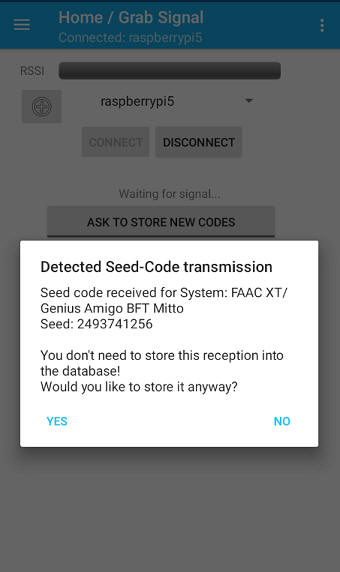
At this point, the Seed-Code will be stored for all future receptions, until another Seed-Code reception is detected, or a Seed-Brute-Force gets requested.
Now press the same button of the Remote again to transmit the signal:
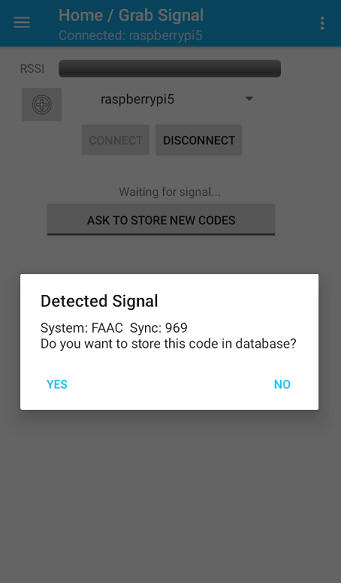
Your remote will be detected, and the signal decoded.
Now you can store it to the database:
Clicking this entry will open your door/gate/barrier.
To copy this remote to a
remote-cloner device, or to learn it into a receiver, you will need to transmit
the Seed-Code first.
You can do this by selecting the database entry, like you would like to edit it:
From the action menu choose: "Send Seed Code":
The Seed-Code will be transmitted for 3 seconds:
After this, press the database entry to send the button signal of this remote, and it is learned to the receiver or copied to a cloner.

If you have a FAAC slave remote, you are in trouble getting the Seed-Code, for using it in Flipper zero.
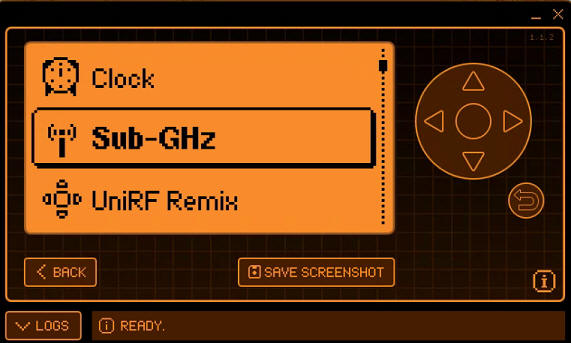
But with the Android App, you are able to recover it using brute force attack.
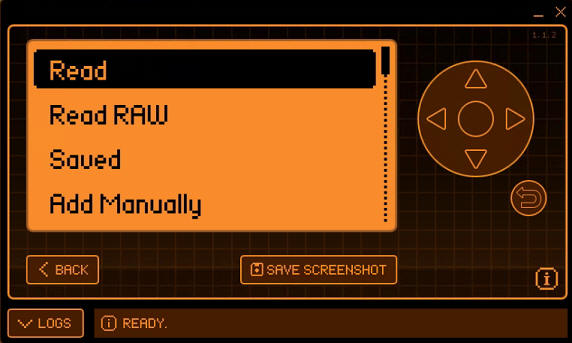
Start your Flipper in Sub_GHz mode, and make 4 captures of one button of your FAAC remote:
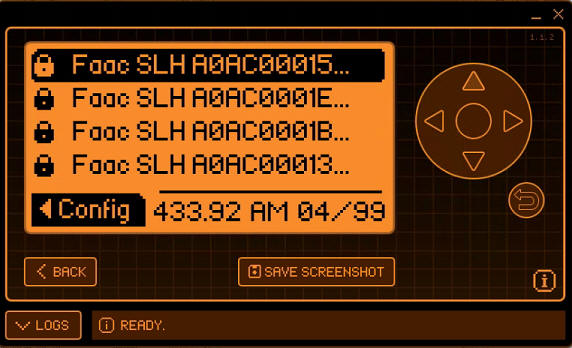
Select each of the 4 captures,
and write down the deatils.
Take care to start with the first capture and select each next capture in the
correct direction (not backwards!):

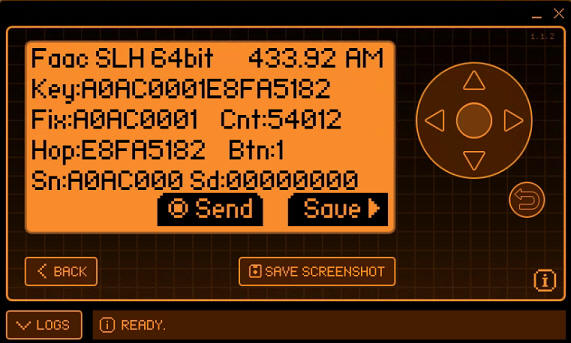
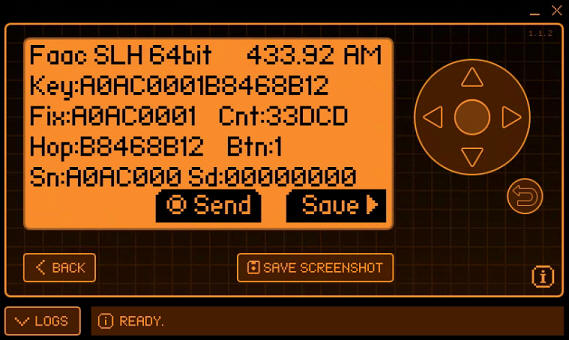
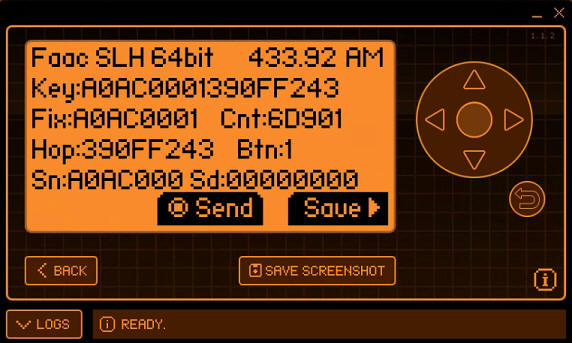
Write down the Fix and Hop
parts:
(For FAAC make sure to use the entire FIX
part and not the Sn part!)
Fix part is the serial number of this remote and for all captures identical: A0AC0001
The Hops are changing of
course:
5D0CA586
E8FA5182
B8468B12
390FF243
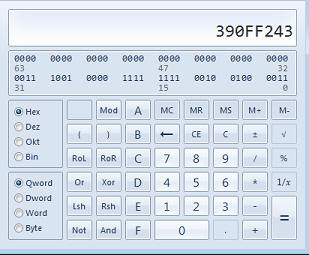
Now use any Hex to Binary
converter, to convert these HEX-values to binary digits.
A good one is here:
https://www.rapidtables.com/convert/number/hex-to-binary.html
Windows integrated calculator will do this job too:
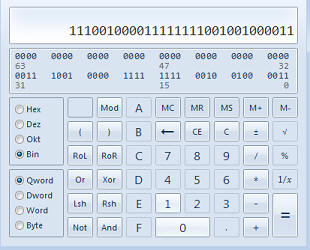
1011101000011001010010110000110
11101000111110100101000110000010
10111000010001101000101100010010
111001000011111111001001000011
Make sure the result has 32 digits. Put in front leading zeros if it's not 32 digits long:
01011101000011001010010110000110
11101000111110100101000110000010
10111000010001101000101100010010
00111001000011111111001001000011
Also convert the serial nr from HEX to Binary and put leading 0 to make it 32 digits:
10100000101011000000000000000001
Concatenate the serial with all 4 hop codes to four new strings like this:
1010000010101100000000000000000101011101000011001010010110000110
1010000010101100000000000000000111101000111110100101000110000010
1010000010101100000000000000000110111000010001101000101100010010
1010000010101100000000000000000100111001000011111111001001000011
The serial goes on the left,
the hop part on the right.
These numbers can be copied to the Android App easily if you use a remote
software like Teamviewer or Anydesk on your PC and Phone.
Now start the Android App and use the Menu to change to the Database, and choose there from the Action-Menu "Add Garage":
In the Address field, you can
put anything to describe this entry. Lets put FAAC1 in there:
And as System, choose FAAC XT/Genius Amigo:
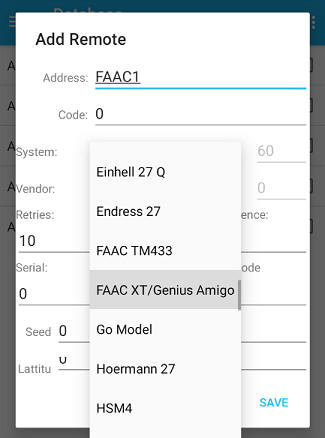
In the Code field, put the
first digit-string which you created before:
And leave the Vendor at RAW:

Save this entry, and for the next three entries you can simply copy this new created entry:
Give the new copied entries new names, and copy the 64 digit string into the Code field, and save.
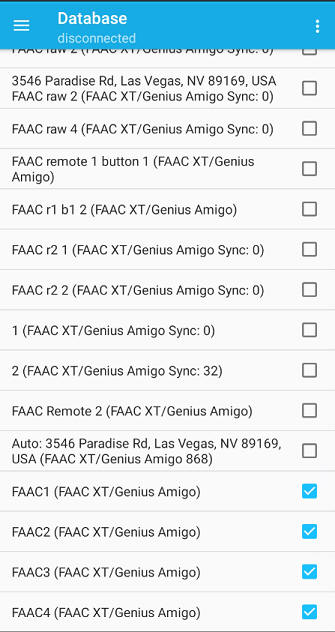
Now select all 4 entries, and choose from the Action-menu: Brute Seed:
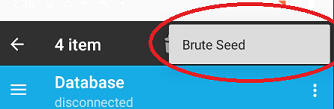
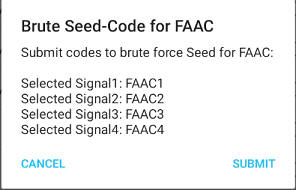
Hit the Submit Button to send
this brute request to the server.
Give the server a few minutes to brute the seed code.
Later select the first entry, and choose from the Action-Menu: Check bruted
Seed:
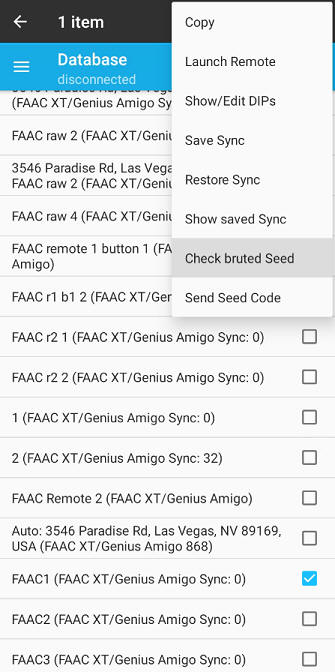
If the bruting was successfull, you will see the Seed-Code:

Take this decimal number and
convert it to HEX with any hex-converter.
This will be now your SEED which you have to put into your Flipper .sub file:
8B55820B
Example FAAC_SLH.sub file:
--------------------------------------------------------------------------------------------------------------------------------------------------
Filetype: Flipper SubGhz Key File
Version: 1
Frequency: 433920000
Preset: FuriHalSubGhzPresetOok650Async
Protocol: Faac SLH
Bit: 64
Key: A0 AC 00 01 39 0F F2 43
Seed: 8B 55 82 0B--------------------------------------------------------------------------------------------------------------------------------------------------
Example BFT.sub file:
--------------------------------------------------------------------------------------------------------------------------------------------------
Filetype: Flipper SubGhz Key File
Version: 1
Frequency: 433920000
Preset: FuriHalSubGhzPresetOok650Async
Protocol: KeeLoq
Bit: 64
Key: A0 AC 00 01 39 0F F2 43
Seed: 8B 55 82 0B
Manufacture: BFT--------------------------------------------------------------------------------------------------------------------------------------------------
Once the direct interface between Android App and Flipper zero is completed, this SEED recovery will be automated.
Using Flipper zero with some
Keeloq remotes, which are using "Normal decrypt" or "Secure decrypt",
is already possible by getting
a device key for your remote, which you can request by
Email.
(Check out the Keeloq-Remotes-List on top to figure out what decrypt method your vendor is using)
Remotes which are using "Normal
decrypt" or "Secure decrypt", are creating a device key, on which a "Simple
decrypt" is used to encrypt the signal.
Because Flipper zero is able to handle Keeloq simple decrypt, there is no
problem in passing you the device key for your remote.
By using the device key in Flipper zero, you can open your Garage, and still
feel save about using rolling code.
But please keep in mind about this fact here: How Rolling Codes are working.
If you rather would like to use
your Flipper zero as a second remote, you would need to use a different serial
number, and "learn" that into the receiver first.
Just send an email if you have further questions.
As a quick support shot, there
is now an option to create .sub files ready to use for Flipper zero,
for rolling code remotes,
using the Raspberry Pi and Android App solution.
Currently only working for Keeloq remotes, but can quickly be made available for other rolling code remotes too, on request.
The Android App has a new option to enable the creation of Flipper .sub files:
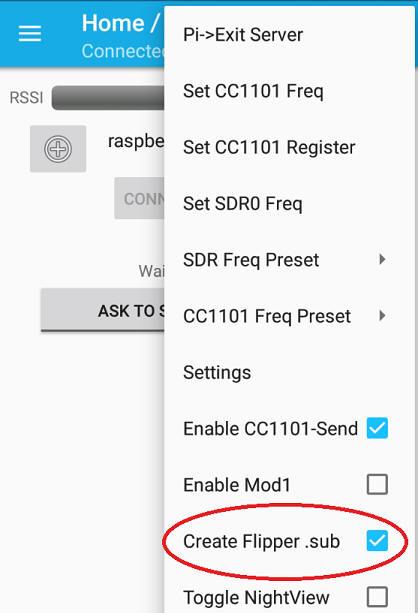
Whenever you open a garage
using the App either through Database view or MAP view,
.sub files will be created on the Raspberry Pi in folder: /home/pi/rf/
starting with the name "Keeloq", followed by internal Keeloq-ID and sync value,
like this
Keeloq0_6.sub
Keeloq0_7.sub
Keeloq0_8.sub
These .sub files will contain RAW signals which are ready to send over the air and open the garage.
Using this solution you can for
example create at home ten .sub files with the next 10 sync values of a remote.
Then transferring this .sub files to your flipper,
you will be able to open your rolling code garage the next 10 times with your
flipper :)
Once you have used up all 10 sync values, you can create another 10 .sub files an so on...
For transferring files from/to
Raspberry Pi, use WinSCP.
It's free and easy to use.
(Please do not abuse this functionality by creating thousands of .sub files at once for multiple remotes, by using scripts, or your account will be suspended!)
Once the direct interface between Android App and Flipper zero is completed, this method will be automated or removed if no longer needed.
You have recorded a signal, and don't know what vendor and rolling code is used?
A new feature is analyzing Flipper .sub files which contain RAW data recordings.
Instructions:
Transfer your recorded .sub
file to the Raspberry Pi into the folder: /home/pi/rf/
and rename the file to: FlipperRaw.sub
(You can use WinSCP for easy file transfer
between a PC and a Pi)
Now start or re-start the module on the pi with:
sudo /home/pi/rf/rfcomm-server -vvv
Wait until Bluetooth is initialized and these green lines show up:

After those 10 seconds, you can connect with your Android App to the Pi.
If the file FlipperRaw.sub exits, it will be read, and the raw signals will be analyzed:
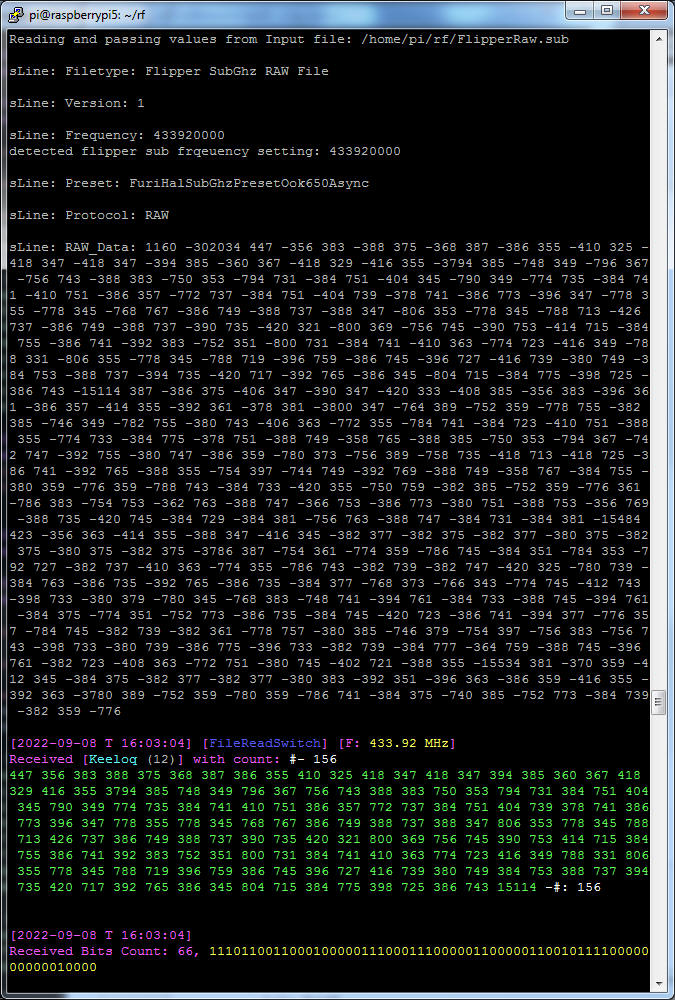
If a signal gets detected, it will be decoded, and the details will be printed, like in this example were a Keeloq transmission has been detected:
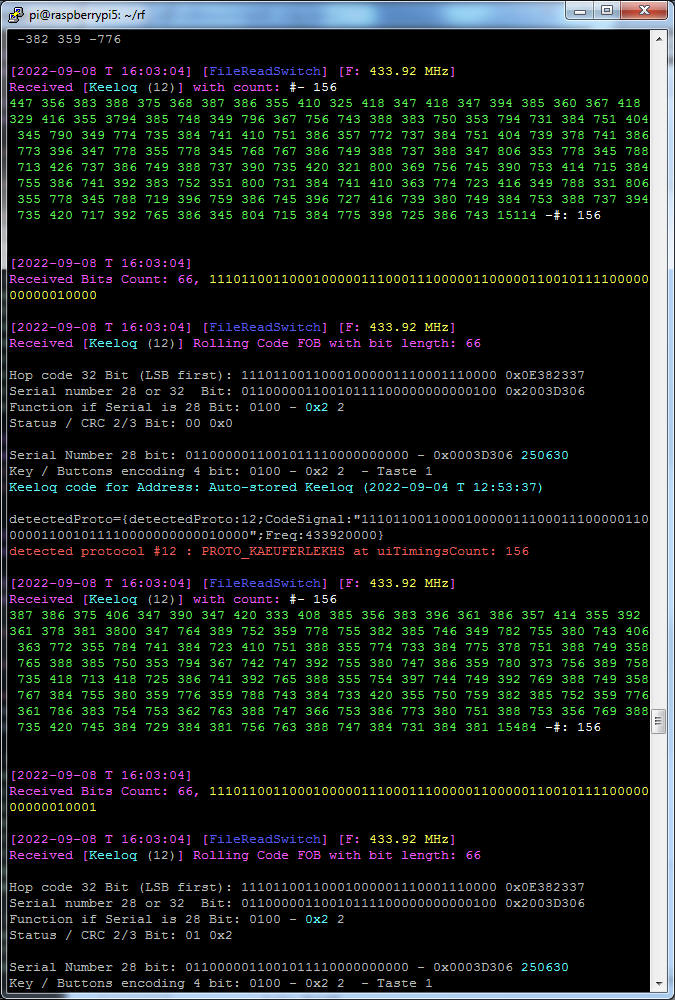
Please don't get confused by the word
"decoded" !
Decoding in this matter means, that the transmitted packet will be decoded into
bits, which is needed for further decryption.
A decryption of a rolling code signal will not be happening on the Pi!
If you are connected with the Android App to the Pi, the detected signal will be sent
to the Android App, which sends the signal to the server for decryption.
If the signal gets successfully decrypted, you will see it in the Android App
like this:
Done!
Do not forget to remove or
rename FlipperRaw.sub
on the Pi!
Otherwise the same analyze will happen on each restart of the Pi module.
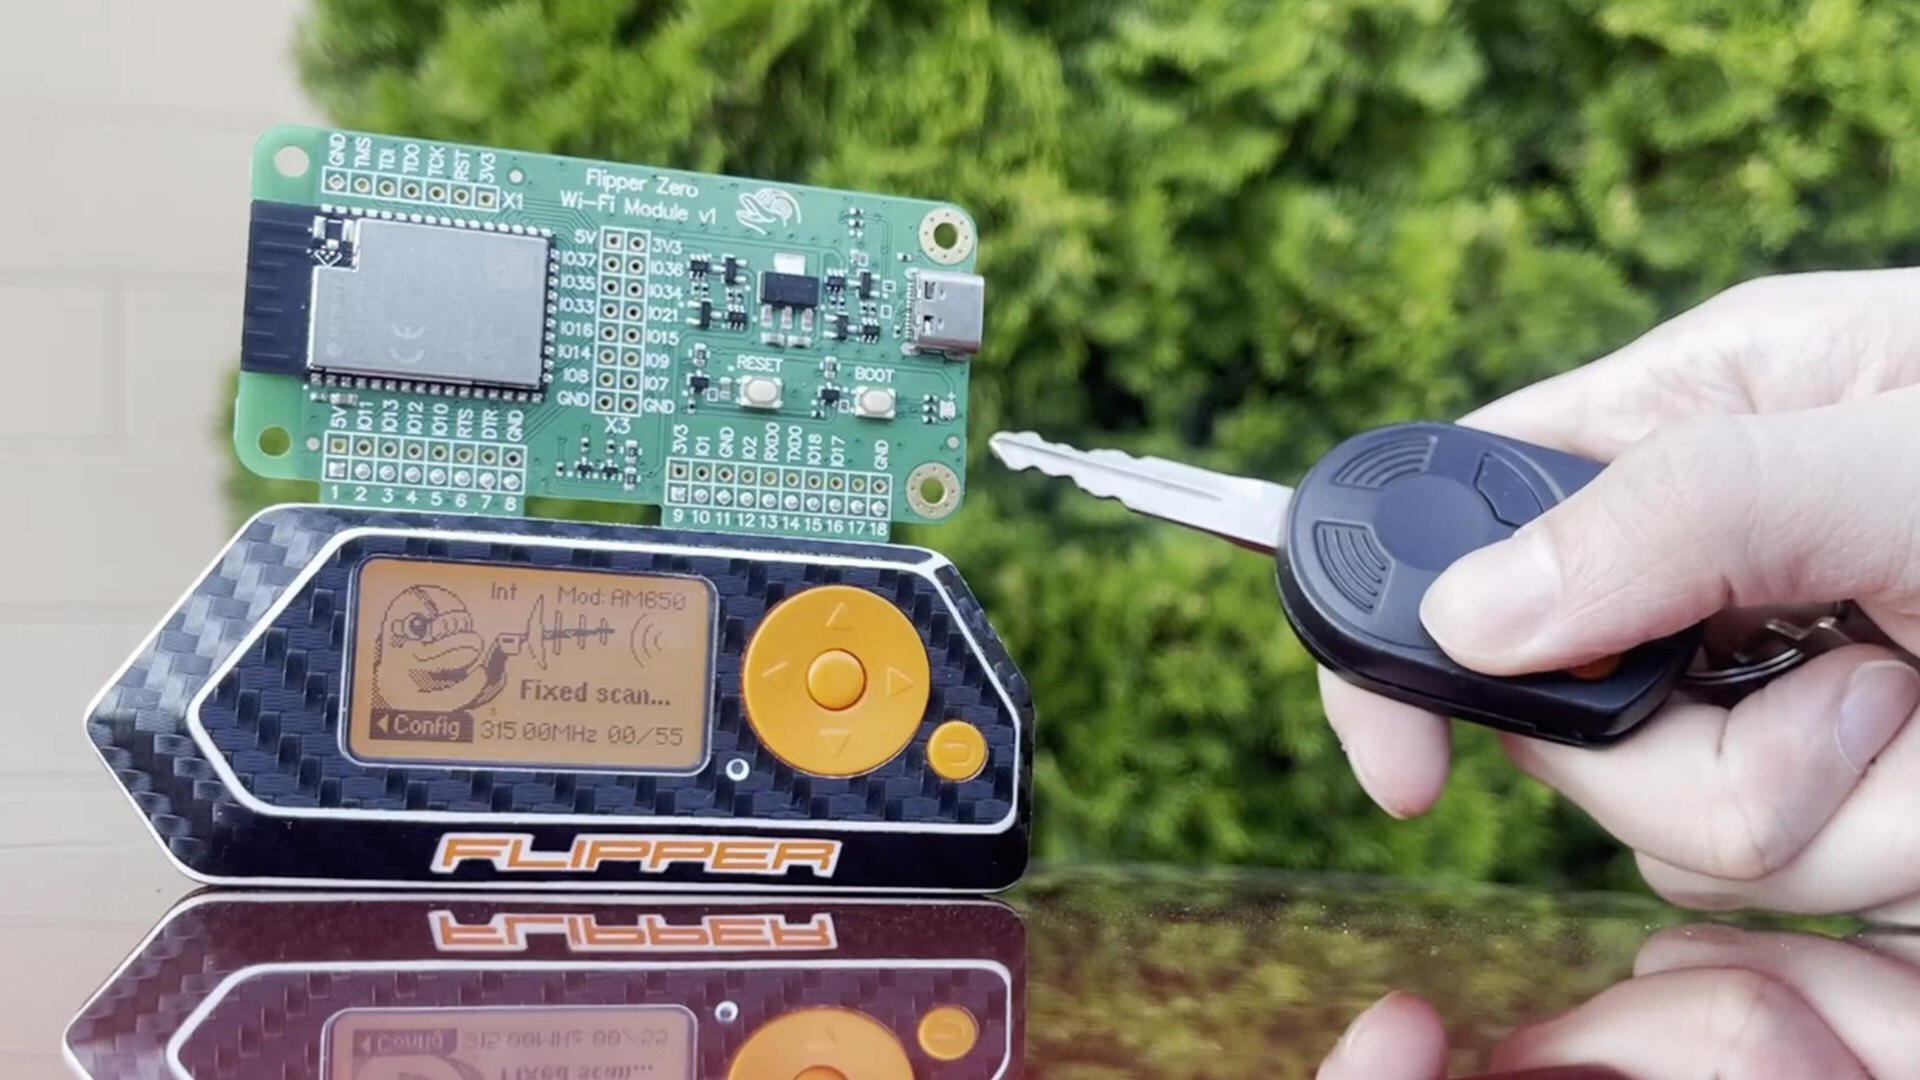
Finally a custom firmware is
available for Flipper zero which can handle many Garage remotes from above,
plus it handles a lot of car remotes.
It is a cooperation work with another developer.
For 1 Flipper full version: latest
QFW + upgrades and support = 2500$
Or:
For 1 Flipper demo pack: latest QFW w/o future upgrades = 1500$
Payable with Bitcoin.
Please contact derrow@yahoo.com to handle
the payment details.
After payment, you'll get a personalized firmware download link, assistance and all instructions how to upgrade your Flipper Zero with the new Firmware.
All Firmwares are personalized
and it is strictly forbidden to pass it to any third party!
Violating this rule disqualifies you for any further support, and your Firmware
and account will be blacklisted for further use!
Below are some videos for your reference:
https://youtube.com/shorts/9i3ZYBgj4Q0?si=DBHfc1M5n0tz8ZDr
Ryan Montgomery
SCARY NEW KEYFOB ATTACK!

https://san.com/cc/millions-of-cars-at-risk-from-flipper-zero-key-fob-hack-experts-warn/
Straight Arrow News (https://san.com/cc/millions-of-cars-at-risk-from-flipper-zero-key-fob-hack-experts-warn/?utm_source=facebook&utm_medium=social&utm_term=&utm_content=straight+arrow+news&utm_campaign=9b63474e-af71-444b-b12d-0cde2cf1a974)
Millions of cars at risk from Flipper Zero key fob hack, experts warn
Hackers are using a custom Flipper Zero firmware to bypass security protections
in automotive key fobs, putting
You want to know if your car is vulnerable without buying an expensive firmware?
If you have a Flipper Zero, or
a HackRf with Portapack, you can send in a recorded signal from your remote for
testing.
If we are able to decrypt the signal, we will send you recordings back for
testing on your car, so you can test if your car is vulnerable.
The charge for this service is 24.90$.
For further questions and informations joing
the Telegram group
![]() :
https://t.me/rfremote or
Discord
support server
:
https://t.me/rfremote or
Discord
support server